If the name doesn't sell you, the man behind the plugin should. I've covered Joost's…
Not too long ago, Google released their first plugin for WordPress called Google Publisher. It makes it very easy for you to connect your WordPress site to Google and manage Webmaster Tools and place ads with Adsense from your admin panel.
What’s It Do?
Google Publisher allows you to authorize your WordPress site through Google, and then connect the two services. This will automatically connect your site to Google’s Webmaster tools, which allow you to view details of your site’s search rankings and structured data. The plugin also connects you to Google’s Adsense service. It features a built-in editor so you can place Adsense ads on your site, preview what they will look like, and automatically add them, without having to touch any code. For those looking to monetize the content of their site, this can be very useful.
How’s It Work?
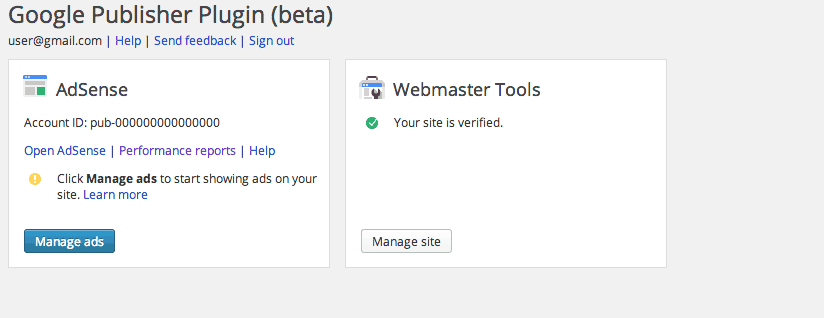
After you install and activate the plugin, you can manage your settings by going to Settings -> Google Publisher Plugin. You will be prompted to log in with your Google account to connect it to your WordPress install. Click the “Get Started” button, log in to Google if you are not already, and then click the “Verify” button to authorize the plugin to use your account credentials. You will be redirected back to the WordPress settings page.

Chose what to customize
The first thing that will happen is the plugin will automatically connect your site to Google Webmaster’s Tools. This may take a few seconds, but after it is finished you will see a green arrow labeled “Your site is verified.” in the Webmaster Tools box on the settings page. Click on the “Manage Site” button below this to visit the Webmaster Tool’s dashboard and get access about your site’s search results, structured data, and other Google-related search parameters.
The Adsense box is where you can manage and customize Google Ads on your site. If you don’t already have an account, you can click “Sign Up For Adsense” to create on. Otherwise, click the “Manage Ads” button to get started.
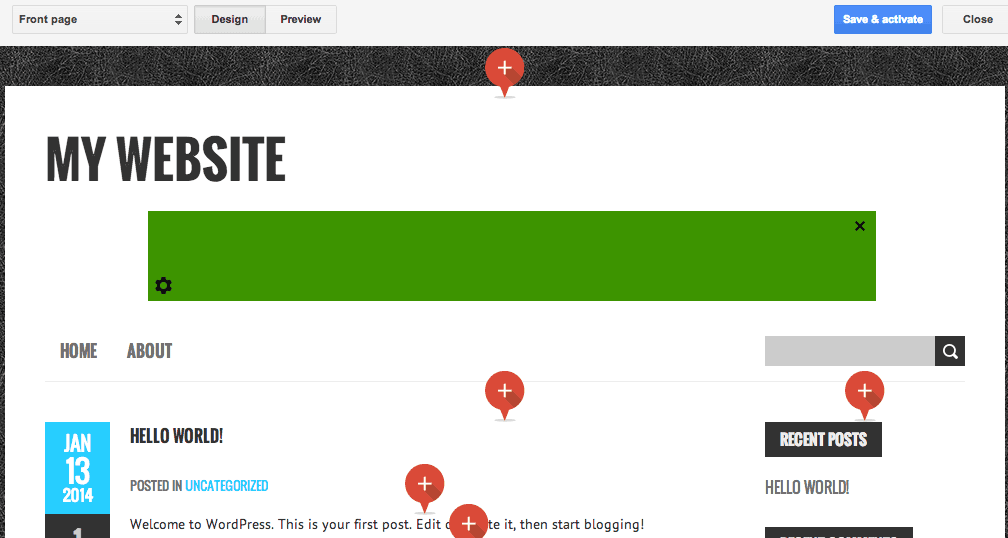
This will bring you to a preview page where you can insert Google Ads on to your site. On this page, you will see your site’s homepage with a few “+” signs scattered across. These plus signs represent where Ads can be placed. Click on any of them to insert an ad. Remember that you can have up to three ads per page.

Just click on any plus side to insert an Ad
Once you have inserted an ad, the plugin will try and identify the best size for each area. If you want to change the size of the ad, however, click the gear button on the bottom left of the inserted ad and select any ad size you want. At the top of the page you will notice that there are two tabs, “Design” and “Preview.” While you are in Design mode, ads will look like green boxes matching the width and height of the inserted ad size. Click the “Preview” button at any time to see what actual ads on your site will look like.
Next to this is a drop-down menu which lists all of the templates currently used on your site. You can choose to include different ads on each template if you wish. Simply select the template you want to change ads for, and a new preview will be generated for that page with new markers. Repeat until you have placed ads on all of your templates. When you are all finished, and you actually want to insert the ads on your live site, click the “Save and Activate” button.
Costs, Caveats, Etc.
Google Publisher is still in it’s beta phase, and I’m sure new features will be added as it expands. For now, it is a great way to connect your WordPress site to Google Services if you need to. You can visit the official Google Documentation for the plugin if you want any more information. Google does not tend to be very active on the plugin’s support forums, so it is best to ask for help directly from them.


