Generally speaking, I would not recommend users inject CSS into their WordPress install, but instead,…
Web fonts have been one of the most exciting additions to the web recently. And Google Fonts has been a great resource for those looking for good looking and free web fonts for their site. But for non-coders, integrating Google Fonts into a website may be a tad difficult. WP Google Fonts takes care of all the work for you, so all you have to do is pick out the fonts you want to use.
What’s It Do?
WP Google Fonts lets you pick up to 6 fonts from the Google Webfont library and add them to your site. For each font, you can optionally select which elements to apply the font style too (headings, paragraphs, etc.) and add in any custom CSS. Or you can just choose the fonts you want, and add the styles to your existing CSS stylesheet.
CSS styles are added to the head of your document so that they override any existing style rules.
How’s It Work?
After you install and activate the plugin, go to Settings -> Google Fonts. This will take you to the Google Fonts Control Panel.
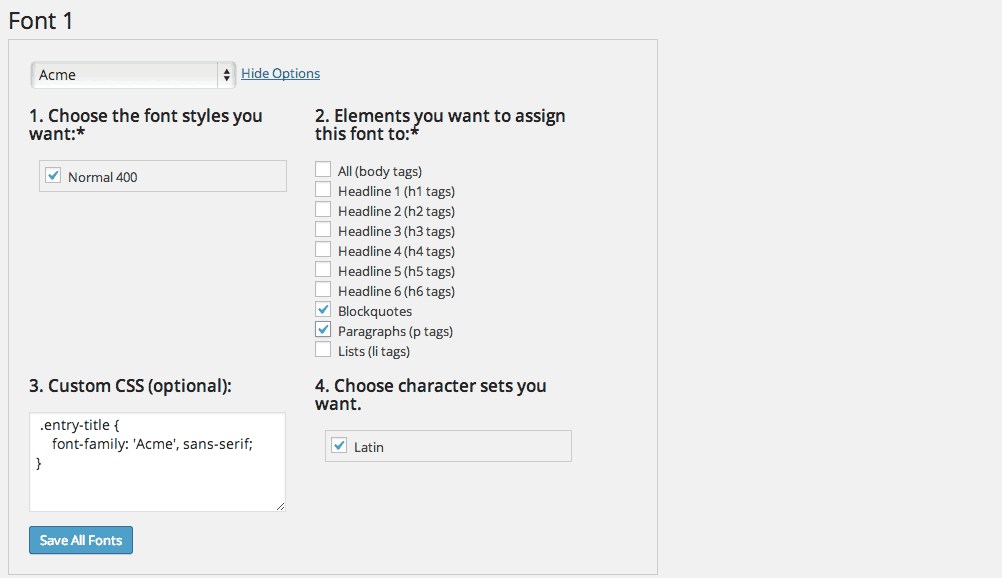
To choose which fonts you want, your best bet is to visit the Google Fonts page and browse until you find a font you want to add to your site. Then, in the “Font 1” section in Settings, select that font from the drop-down menu.
This will load some additional options for the font. You can choose which font weights you want to load in by checking off the boxes next to each. Remember that the more font weights you choose, the “heavier” your page will be, meaning the slower it will load. So keep it to only the font weights that you need.

Your font options
You can also choose from “Elements you want to assign this font to”. This will have a list of common elements from your page. This includes heading tags (h1, h2, h3, etc), paragraph tags, or “All body tags” which will apply this font to every element on the page. This step is optional but is really useful for non-coders. Simply select the elements you want to apply the selected font too, and you will automatically see the changes affected on the front page.
There is also a box if you want to add custom CSS to your page. So, for instance, if you want to add the included font to a specific class or ID, you can do it here. I actually wouldn’t recommend adding in your custom CSS here, but instead adding it to an existing style sheet, so that you can keep everything as lean and performant as possible.
If you want to use the Google Fonts you loaded it in your stylesheet, you can just list it like any other font. So let’s say I’m using “Annie Use Your Telescope” on my “.entry-title” class. I would add this CSS to my stylesheet:
.entry-title {
    font-family: "Annie Use Your Telescope", arial, sans-serif;
}
You can repeat the above steps for each font you want to add to your site. The plugin allows you to add six fonts, but you really shouldn’t load in any more than 2. If you start bringing in too many fonts, your site will start to drag down a bit in speed. And besides, too many fonts leads to a cluttered design.
Costs, Caveats, Etc.
As far as I can tell, WP Google Fonts takes care of Google Font loading in a quick and efficient way. It is updated from time to time and if you’re looking for any help with it, be sure to visit the support forums.


