As a developer/designer, I too often have a tendency to chalk up SEO to snake oil and…
If the name doesn’t sell you, the man behind the plugin should. I’ve covered Joost’s popular WordPress SEO plugin before; the Google Analytics for WordPress plugin enhances how much you can get from GA automatically.
What’s It Do?
At it’s very simplest, this plugin lets you authenticate your site with the Google Analytics app and inserts the tracking code into your header. But really, the plugin lets you squeeze way more out of your analytics then its default settings with just a few small tweaks. You can track outbound and inbound links more explicitly, set custom variables to collect WordPress specific data, and turn on and off advanced and less visible Google Analytics settings, all within your admin panel.
How’s It Work?
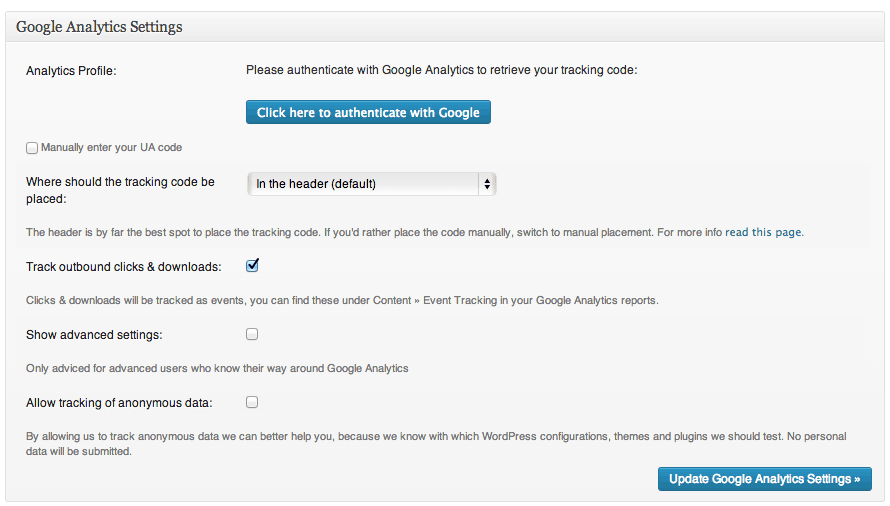
After installing the plugin, you will be directed to the Settings page, which can also be found at Settings -> Google Analytics. The first thing you will have to do is authenticate your site, which you can do by clicking the “Click Here to Authenticate with Google” button. You’ll be directed to the Google authentication screen, where you can select “Allow Access.” Then just chose the GA profile you want to assign your site analytics to from the drop-down menu. Alternatively, if you already have a tracking link, you can enter it in manually by clicking the providing link and copying and pasting it into the text field.

Basic options and Analytics authentication
Below this, you will see a drop-down menu labeled “Where should the tracking code be placed.” Unless you have a strong reason to place it elsewhere, it’s best to leave this option on “In the header.” The Google Analytics script is asynchronous, meaning it won’t start downloading until all of your content has finished loading so don’t worry about it slowing down your site wherever the placement.
Once your WordPress site and GA are connected, it will begin tracking analytics on your site automatically, just as it normally would. But there are also a few more things to configure to get the most of the plugin and your own data.
The first checkbox in the main configuration is “Track outbound clicks & downloads.” If you click on this you will be track users that click on links that leave your site, and what download links are clicked on in the Behavior -> Events section of the Google Analytics admin. Clicking this will also bring up several more options for “Internal Links to Track as Outbound.” If you have a section that you want to treat as if it is a cloaked external link, for affiliates, for instance, you can add that directory into the text-field and they will be grouped with other outbound links.

Some additional settings for tracking links
The next checkbox in the main configuration is “Show Advanced Settings” which will open up several new option boxes to further customize the plugin.
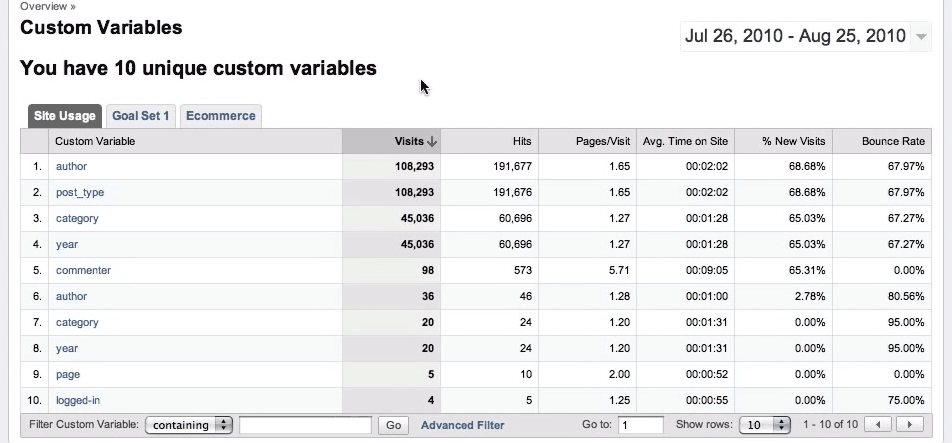
The first section is Custom Variables Settings. Custom Variables are a feature of Google Analytics which allow you to individually track your data based on certain parameters. Defining these parameters can be a bit tricky, but the plugin takes care of that for you. For instance, let’s say you want to track how much traffic each of your individual authors gets. Simply click the box next to “Author Name.” Now you can go to Audience -> Custom in the Google Analytics admin and you will see pageviews, visits, time on page, etc. broken down into each individual author. The same can be done with categories, post types, and so on. You can specify up to 5 custom variables, so simply check the box next to each variable you want to assign, and the plugin will ensure that Google Analytics starts tracking that parameter.

Tracking custom variables in the GA dashboard
Below this is the Advanced Settings section which is really only for people that know Google Analytics well. Most things can be kept at their default and even I can’t profess to know what everything truly means. Still, you can do things like track downloads and outbound links as pageviews, track the full URL instead of just root domain of outbound links, enable Cross-Domain tracking and track Adsense if you have ads on your site. One option to pay attention to is “Host ga.js locally”. This will take the Javascript file that GA uses to track your page and host it on your own servers instead of Googles. There are only a few use cases for this feature, but it may be helpful to you.
You can also turn on and off advanced features of Google Analytics by checking the box next to each. For instance, you can disable “_setallowHash”, allowing you to properly track subdomains, and add “_anonymizeIp” which removes IP information from tracked users before it is reported. Again, leave these in their default settings if you’re not sure what they mean, but these features can be extremely helpful for those that know their way around the Google Analytics dashboard.
Click the “Update Google Analytics Settings” button at any point in the process to save your settings, and you’re all set. If you visit the Google Analytics dashboard you will be able to see your custom variables, and outbound links and downloads if you chose to enable those. Other then that, Google Analytics will track your site as normal and you’re done.
Costs, Caveats, etc.
The plugin is completely free and updated to keep pace with WordPress and Google Analytics updates. Joost has stopped supporting free plugins, but the plugin is quite popular and you should be able to find help on the FAQ or the support forums if your problem is something more specific.


