If you're a WordPress developer, chances are from time to time; you just want a…
When you’re working with PHP, Cron jobs will quickly become your friend. They allow you to run PHP scripts and WordPress actions at routine intervals, in the background. And yes, there are some running on your WordPress install right now. WP Crontrol lets you organize them, and create new cron jobs right in your admin screen.
What’s It Do?
WP Crontrol really has two functions. First, it will list out for you all of the cron events that currently exist on your WordPress install. You can easily edit, delete or run any of these from your admin panel.
Second, WP Crontrol lets you create new cron events, either using an existing WordPress hook or with custom PHP code. More on that later. You can easily set whatever interval you want to perform the action, and it’s easy to add custom intervals you can use at any time.
How’s It Work?
Once you’ve installed and activated the plugin, go to Tools -> Crontrol. The first thing you will see is a list of cron events that currently exist on your site. WordPress, by default, will automatically activate a few. The “wp_update_plugins” job, for instance, runs every day and checks for new updates to plugins to alert users about them.
For each cron event listed in the Crontrol panel, you will see what arguments are being passed to the event (meaning what variables the hook functions are accepting), when the next run will occur, and the recurrence interval of each. If the cron event is a one-time thing you will see “Non-repeating” in the last row. The publish_future_post is a good example. The argument passed to it will be the post ID, and the event will be non-repeating. This is how scheduled posts are published without you having to do anything.

A list of cron events
You can click the “Edit,” “Run Now” or “Delete” link next to each cron event to effect it. The Edit link will take you to a form to edit what action is being performed, and what arguments to pass to it. The Run Now link will ignore the Recurrence column, run the cron event right away, and start the interval over again. The Delete link will trash the event. Make sure you only click this link if you are absolutely positive an event is safe to delete.
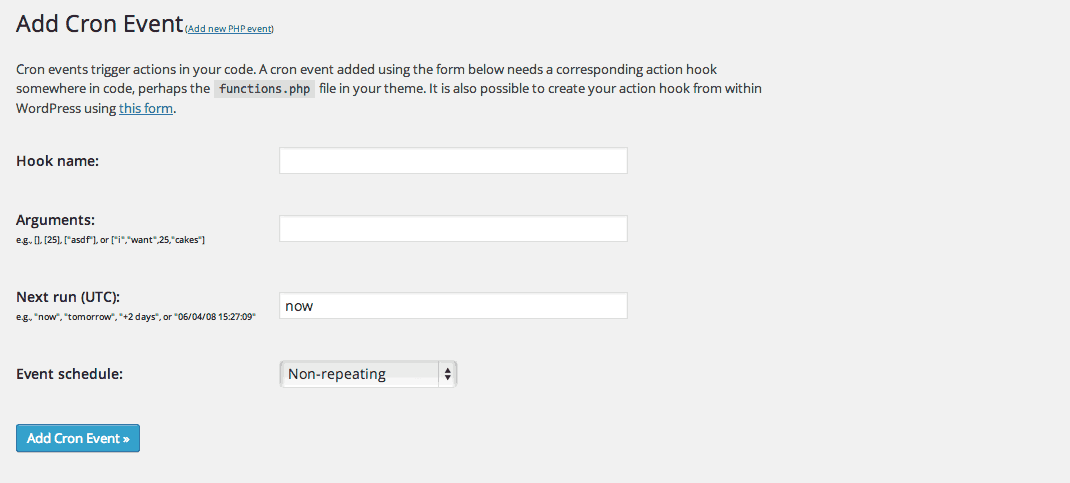
At the bottom of the Crontrol page, you will see a form to create a new cron event. To add a new one, first fill out the hook name that you want to invoke. This hook needs to exist on your WordPress install somewhere, typically in the functions.php. Any action you’ve set up in WordPress can be used, either a custom one or an existing one (like publish_future_post). Next, fill out any arguments you want to pass to the hook. This is only necessary if the action you are using requires variables to be passed to, like when performing a function. The syntax for arguments is [arg1, arg2j, “etc”]. Pass as many arguments as necessary. You can then specify when the first run of the event should be, which defaults at now, but you can set any interval. Then select how often you want the event to occur from the “Event Schedule” drop-down. If you want to only perform the event once, simply choose “Non-repeating.”

Create your own custom cron event, right in the admin settings window
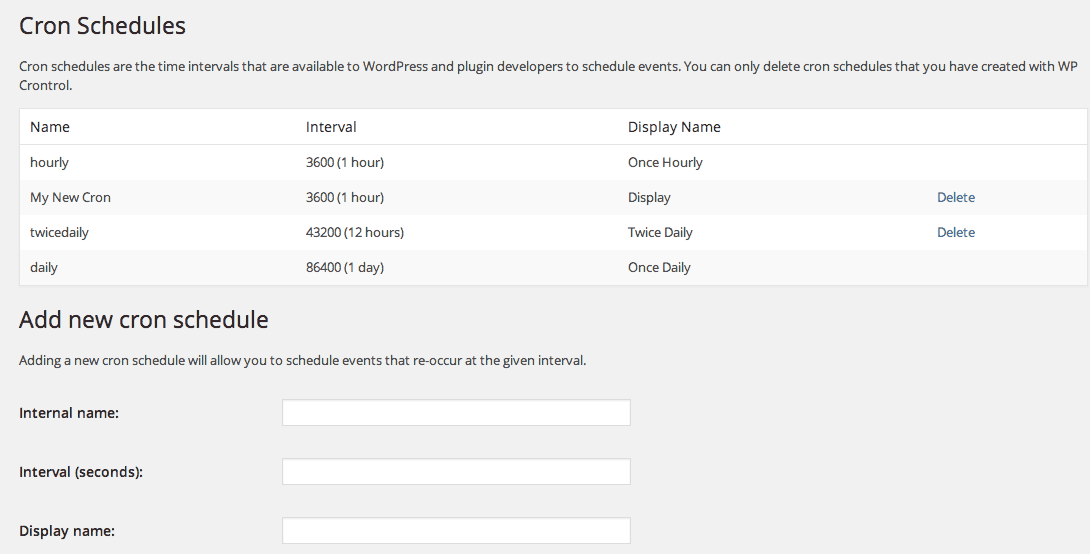
If you want to specify a custom interval that is not listed, go to Settings -> Cron Schedules. At the bottom, you will see an “Add new cron schedule” section. Type in a name for the interval, and the interval you want (in seconds), then a display name, and click “Add Cron Schedule.” This interval will now be added to the “Event Schedule” drop-down.

Set your own intervals in the settings menu
There’s also a way to add a Cron job with custom PHP. Go back to Tools -> Crontrol. In the description text, you will see a link to “this form” at the end. Click on this and you will be taken to a new kind of Add Cron Event form. On this one, you just need to enter your custom PHP Code, then set the “Next Run” and “Event Schedule.” You can enter any PHP code here, though this isn’t the recommended method. It’s better to set up your PHP code on the server, then hook into it. After all, that’s what WordPress hooks are for.
Costs, Caveats, Etc.
For the developers out there, you can access WP Crontrol from inside WP-CLI using the “crontrol” command. Other then that, the plugin is updated here and there for bug fixes. If you are having trouble with the plugin, you can visit the support forums for help from the developers.


