If you are a theme developer, there may be a base theme you are probably…
For developers, having control over where your widgets are displayed can be extremely helpful. Widget Logic uses PHP and WordPress Conditional Tags to hand over that kind of control.
What’s It Do?
Widget Logic adds a simple text area to every widget in your dashboard. In this, you can type either conditional tags or custom conditional PHP statements to determine which pages specific widgets should load on. This gives you control over all of your widgets, without having to create separate sidebars for different conditions. The code that you enter into this text area is automatically inserted into your theme pages attached to a specific widget. It also has options to tweak when the plugin should load and to fix compatibility issues with themes and other plugins, and adds a filter to customize output even further.
How’s It Work?
Upon activation, visit Appearance -> Widgets you will see a new section at the bottom labeled “Widget Logic Options”. The first option is a checkbox to enable the “widget_content” filter which you can use in your theme files to filter and change the output of the plugin, which I will touch on later. The next option is a checkbox to use the “wp_reset_query fix.” This is for when you are having problems with the plugin working properly. By default, you should leave these off, but if you are finding that conditional logic is not being applied to your widgets properly you may want to try turning this on. It should fix problems that are caused by themes or other plugins.

Your Widget Logic options
Finally, you will see a drop-down menu labeled “Load Logic.” By default, the plugin will load the conditional logic you add to each widget as soon as the plugin starts, even before wp_head is called. However, if your plugin or widget logic depends on code that is in your theme’s function.php file, or you would like to delay the loading of the conditional logic for any reason, you can choose “after theme loads” or later on in the WordPress load process. When you are finished with these options, click “Save WL Options.”
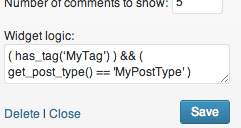
If you open any Widget, you will see a new text box at the bottom labeled “Widget Logic.” It is here that you can enter conditions for when a widget should appear based on PHP and WordPress conditional tags.

Just enter your logic into the box.
If you are just using WordPress conditional tags, then all you have to do is enter in that tag plus any PHP operators. For instance, if you want a widget to appear on every page but the homepage, simply enter
!is_home()
For one line conditions like this, the plugin will automatically enter in a semi-colon and a return at the beginning, so you only have to enter the tag. This work’s for slightly more complex conditional tags as well. Let’s say, for instance, that you want a widget to show in a certain post type with posts of a certain tag.
( has_tag(‘MyTag’) ) && ( get_post_type() == 'MyPostType' )
Just replace “MyTag” with the slug of your desired tag and MyPostType with your custom post type. Using WordPress conditional tags you can get pretty specific, even down to a page.
is_page('MyPage)
Again, replacing MyPage with the slug of the page you want to single out. There are lots of WordPress conditional tags baked in, so I encourage you to explore the Codex for more information. It will get you where you want to go, as far as logic is concerned, about 95% of the time. If, however, you need to define a condition that is outside the scope of WordPress, you can use any PHP in the Widget Logic textbox as well. But if you do, make sure you add a “return” and a semicolon to your statement. For instance, if you put this in the text-box of a widget:
global $post;
return (in_array(77,get_post_ancestors($post)));
It will include that widget only in pages that are a child of Post ID 77. Notice how I included a return and proper PHP syntax. This is, of course, only for serious developers who know what they are doing with PHP. If you do not, then it is best to stick to some conditional tags, as I often do. But you can also get creative with it. The plugin does not limit what you can do with it, it just sets WordPress up to bind logic to specific widgets.
The last useful feature to know about is the widget_content filter, which can be enabled in the “Widget Logic Options” section. If you do enable this, you can open up your themes’ functions .php file and add this filter to hook into the output of the plugin and create something new when the plugin is run. For instance, let’s say I wanted to add a very simply footer to the bottom of a widget with an ID of 1. I could open up my functions.php file and add this.
add_filter('widget_content', 'basic_widgets_filter', 10, 2);

function basic_widgets_filter($content='', $widget_id=''){

        if($widget_id == '1') {

                $end = "</aside>";
                $new = "<p>Extra text</p>";
                $content = str_replace($end, $new . $end, $content);

        }
        return $content;

}
If you understand what this means, you can tell that it is very basic and maybe not all that useful, but it’s just for demonstration purposes. You can basically use the filter to modify the output of one or all widgets though. In this example, the function will find the closing ‘aside’ HTML tag, and then append an extra paragraph before closing it again for the specified widget. The plugin developer gives another example of adding new CSS classes to alternating widgets so that the first widget would have the class “widget_style_a”, the second “widget_style_b”, the third “widget_style_a” again and so on.
add_filter('widget_content', 'make_alternating_widget_styles');

function make_alternating_widget_styles($content='') {
	global $wl_make_alt_ws;
    $wl_make_alt_ws=($wl_make_alt_ws=="style_a")?"style_b":"style_a";
    return preg_replace('/(class="widget )/', "$1 widget_${wl_make_alt_ws} ", $content);
}
There are plenty of extensions that can be made if you are a WordPress developer. Overall, the plugin encourages flexibility so that you can use it as a sandbox to hook into a widgets output for whatever you would like.
Costs, Caveats, Etc.
Widget Logic is free and updated from time to time. If you are having a problem with the plugin you can try the support forums. However, the plugin has also been embraced by a good amount of the WordPress developer community so you can also turn to Stack Overflow or something similar if you have a question.
Also, if you feel as if you want to contribute to this plugin, the developer asks that you make a donation to Cancer Research, which is a terribly nice thing for you to do.


