Generally speaking, I would not recommend users inject CSS into their WordPress install, but instead,…
As a successor to WP Table Reloaded, TablePress has a lot of the same features, but it’s been updated and maintained to keep up with WordPress. It lets you easily create data tables, large and small with little to no coding.
What’s It Do?
TablePress provides you with an admin interface to create tables, with as many rows and columns as you would like. You can import existing CSV, HTML, JSON and Excel files (including Excel calendar templates) to use as table data, and export your tables once you are done. You can also change the data using an advanced text editor and drag and drop functionality which comes very handy if it’s extracted with a tool like ScraperBox.
TablePress also has settings to tweak the output of the tables, which are inserted into posts and pages using a simple shortcode. You can add your own Custom CSS and change the general look and functionality of tables to include sorting, search, and pagination.
How’s It Work?
When you install and activate the plugin, you will see a new admin section labeled “TablePress.” If you go to TablePress -> Add New Table you can get started with your first table. Enter the table name and description into the text boxes provided. You will have the option to change these and set whether or not they should be shown later. From the number selector, select how many rows and columns you would like. Again, rows and columns can be added or deleted later.
If you already have data laid out in a CSV, HTML, JSON or Excel file, you can also import this as a new table. Go to TablePress -> Import a Table to do so. First, select the source of your file. You can upload a new file, or chose an existing file with its URL or server path, or just copy and paste the data into a text area with “Manual Input.” Make sure you specify what type of file it is, and then select whether you want to take the data and “Add as new table,” “Replace existing table” or “Append rows to existing table.” If you chose the last option, simply select which table you want to add the data too, and it will be automatically added to the end.
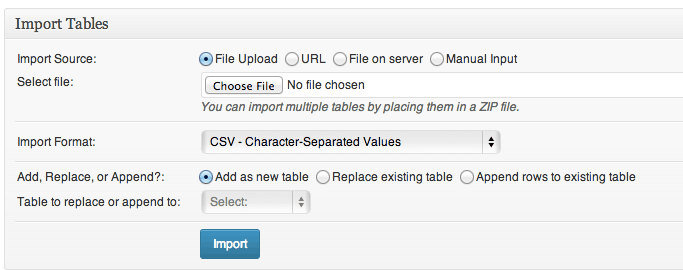
Import tables from CSV, HTML, JSON, and Excel
Once you have created or imported a new table you will be brought to the table editor. At the top, you can change the Table Name and Description. You can also edit the ID of the table, but only change this if you really have a need to do so.
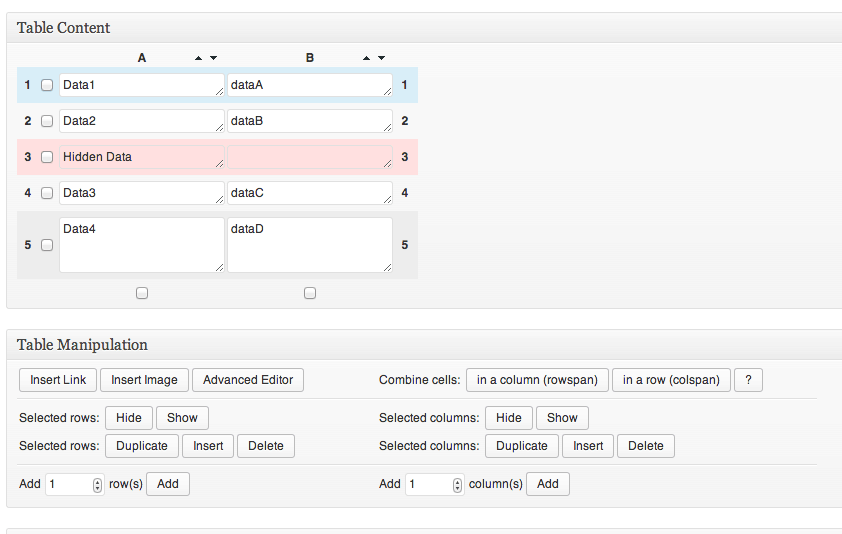
Below this, you will see the “Table Content” section. Here you can edit the individual data of the table by clicking on any table cell. You can also rearrange your rows by dragging them in the order you want them presented in.
The “Table Manipulation” section contains all of the actions that can be performed in the table editor. The first row allows you to “Insert Link,” “Insert Image” or use the “Advanced Editor.” In order to use any of these tools, first, click the action, then select the table you want to insert something in. So, if you click on “Insert Image,” then any table cell, the media uploader will be brought up and you can upload an image and insert it into that cell.
Edit table data in the admin panel
Next to each row and below each column, there is a checkbox. These can be used to perform bulk actions. Check off any row or column you want to edit, then select “Hide,” “Show,” “Duplicate,” “Delete” or “Insert” to perform that action on the selected rows. Hiding a row or column will remove it from the outputted display, but not remove the data entirely. Deleting a row or column will remove it permanently.
The next section, “Table Options” has some general options for the table you are editing. You can designate the first and last row as the header and footer of the table, which will be assigned a different styling, and chose whether or not to alternate background colors and change the background color on hover for easier readability. You can also choose whether or not you want to display the title and description of the table, and chose from the drop-down menu where these should be placed, and specify custom CSS classes specific to this table.
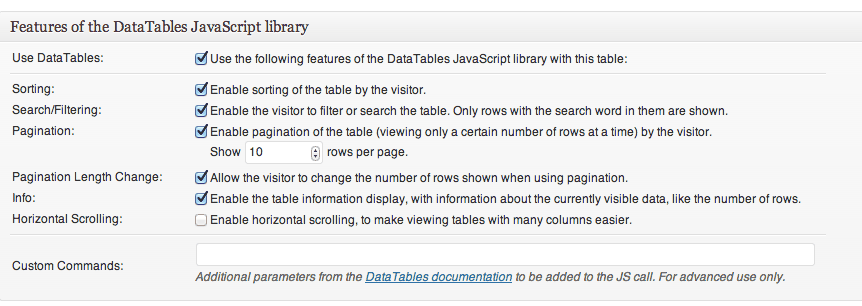
TablePress uses the Datatables Javascript library to add some extended functionality to its outputted tables, such as search, sorting, and pagination. You can turn this off completely by unchecking the “Use the following features…” checkbox. If you do so, the table will still be styled, but it will display all of its data and will not have any extra features. Below this, you can choose which features to turn off and on, and tweak options in “Sorting,” “Search/Filtering” and “Pagination.” Under “Pagination” you can also choose whether or not users should be given the option to change the number of rows displayed in a drop-down menu and whether or not to turn on Horizontal Scrolling, which will make the table expand past its container, but can be effective for tables with a lot of columns.
Customize the Javascript output of your tables
When you are finished changing the data and the settings of your table, click the “Save Changes” button.
At the top of the table editor, next to the table title, you will see a field labeled “Shortcode.” This is how you will insert the table into your posts and pages. Simply copy and paste this shortcode anywhere and your table will be added, along with your settings. The shortcode will look like this.
[table id=1 /]
With the id number replaced with the ID of your current table. You can also go to TablePress -> All Tables to get this code. Here all of the tables you have created will be listed. If you hover over them, you will see options to Edit, Copy, Preview and Delete your table. There will also be a link titled “Show Shortcode.” Clicking this will bring up a pop-up box that will show the shortcode, which you can then copy and paste into any post, page, widget or even a coming soon page.
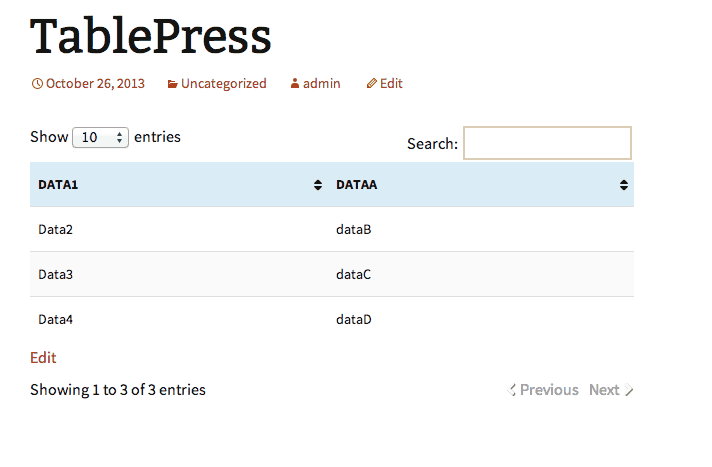
A dead simple Table example
Tables will be displayed, with the help of Javascript, as sortable and with pagination, if you have these options enabled. They are not strictly responsive but do have horizontal scrolling enabled on smaller screens so that data is still visible and readable. There is also a responsive tables premium add-on if you need the at functionality which allows tables to expand beyond their container. By default, the drop-down menu and pagination will inherit styles from your theme so it should fit in with the style of your site fairly well.
The option “Export” is also included, which can alternatively be reached by going to TablePress -> Export a Table. You can simply select a format you want to export the table to (CSV, JSON or HTML), select the tables you want to export and download the file right to your computer.
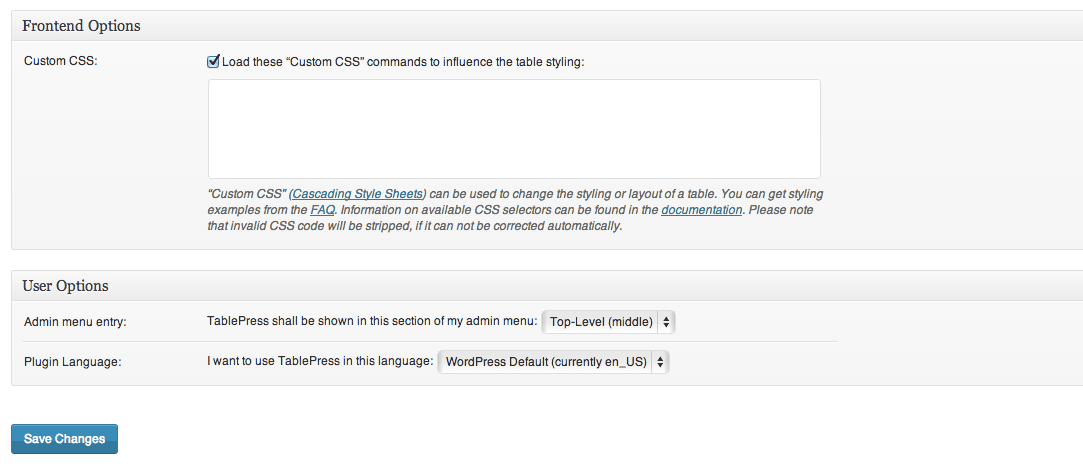
The last section is TablePress -> Plugin Options which has a few global settings. The first section has a text area where you can insert custom CSS styles that should be applied to all tables. There are several examples of how to do this on the Plugin’s FAQ page so visit there if you need some help. Below this is a drop-down menu that specifies where the TablePress option should be displayed, and what language should be used with several translation options available.
Just a few tweaks in the plugin settings
There is certainly more complex features of this plugin, but getting your first table up and running can be done fairly quickly.
Costs, Caveats, Etc.
TablePress is free and updated very often. The source code for the plugin is hosted on GitHub if you want to contribute some code, or you can always make a donation if you’d like to contribute in that way.
If you are having a problem with the Plugin, the FAQs are a good place to start, along with the full documentation on the plugin’s website. But the support forums are the place to go if you have a specific question.
TablePress also has several add-ons to extend the feature set of the plugin so if you need something a little extra, you will probably be able to find a suitable add-on.