
A pretty simple and useful plugin, Page Template Dashboard lets see you what templates your…
There are lots of third-party newsletter services out there. Though, to my mind, I haven’t seen one as tightly integrated with WordPress as MailPoet.
What’s It Do?
MailPoet gives you the ability to create one time or automatically recurring newsletters through your WordPress admin panel. It has a drag and drop interface for creating newsletters, which are built to work across different mail browsers, and are mobile friendly and ready. You can manage multiple lists of subscribers, shift people around, and set up multiple newsletters for each list. And subscription buttons can be added to your site in several simple ways, with a widget, shortcode, PHP, HTML or in an iframe.
The plugin also features a number of standard newsletter perks, such as basic statistics in their free version (and more advanced stats for premium users), autoresponders, notifications, free email templates to chose from, and import support from MailChimp, Subscribe2, Aweber, and others.
How’s It Work?
Like a lot of plugins on Tidy Repo, MailPoet can be quite advanced and has lots of little features. What I will cover here is its basic setup and functionality, but there’s plenty more you can do with it.
After you install and activate the plugin, you will notice a new section in your admin panel labeled MailPoet. If you click on MailPoet -> Subscribers you will be brought to a list of your subscribers in all lists. By default, all of your WordPress users will be grouped into one list, and you will have a new list for other users. You can go on using this list, or select “Add List” from the top to create a brand new one. This is mostly for you so that you can group different subscribers together, but there is also an option to include a list of lists for users to chose from when they are subscribing, if you plan on having multiple newsletters on different topics. Simply enter in a title and description for your list and select “Add List.”
Now you can go to MailPoet -> Newsletters to get started creating your first newsletters. Like posts, newsletters will have a draft and published mode. A basic template will automatically be added called “5 Minute User Guide.” If you’d like to see what a template can look like this, hover over this newsletter and select the “Edit” link. It will have several examples of what you can do. Otherwise, it is probably best to delete and create a new one. To do so, select the “Create a New Email” button from the top but make sure not to do these mistakes while building an email list.
The first step is to Add some very basic details. You’ll want to enter in a subject line for your email. There are several shortcodes you can use to generate the field dynamically. Let’s say, for instance, you wanted to say Hello to your user in the subject line, simply add:
Hello [[user:firstname | default:subscriber]]!
This will put the users’ name that they entered in their subscription form right in the subject line. If they didn’t enter in this information, then it will display “Hello subscriber!” There are several other shortcodes you can use as well. You also have to select which subscriber list you want to send the newsletter to. Select as many as apply.
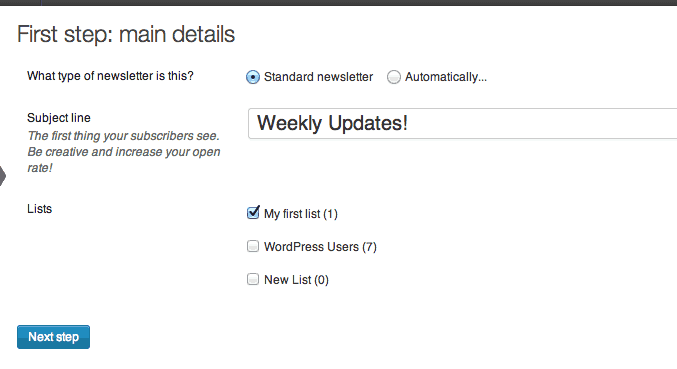
First, enter in details for your newsletter
Now you have to select which type of newsletter it is. There are two options, “Standard Newsletter” and “Automatically…” The Standard Newsletter is one time only or sent out manually. The automatic newsletter will be automatically recurring and can be set up on a schedule, automatically adding new posts. If you chose this option, you will have new drop-down menus to chose how often to send it (weekly, monthly, etc.) and on what day of the week and time. Once you have filled out all of these options, click the “Next Step” button.
It’s time to actually create your first newsletter. This is quite possibly the easiest part of the process. On the right side, you will see several different tabs for different options. The first tab is Content. This is how you add things to your newsletter. You can include a basic text box, WordPress posts, a divider and social bookmarks. If you are using an automatically recurring newsletter you will see an option to add “Automatic latest content.” If you drag this over to your template, it will give you a few options, automatically adding your most recent posts in case you want to give your subscribers recurring updates. Select the post type, number of posts, category and a few styles to customize everything. Once you click “Done” you will see your latest posts appear in your template, just as they will automatically each time the newsletter is sent out, except they will be replaced by new content.

Automatic Latest Content tab
Next to the “Divider” button, you will see a gear icon, which lets you select which divider style you want to add. After you select that just drag it over to add a simple divider to your template. The same goes for Social bookmarks, which has several different styles that can be added. If you chose to add them, you just have to enter in your URL for each social profile and then drag the box in, and social media buttons will be added to your newsletter.
The next tab is Images. Click on the “Add Images” button to upload images to your newsletter, and then drag them into the template just as you would anything else. Once they are in there, you can resize them or move them around simply by dragging and dropping. You’ll notice that there is a space reserved for a Header Image and Footer Image in your template. You can drag an image from the Images tab into these slots.
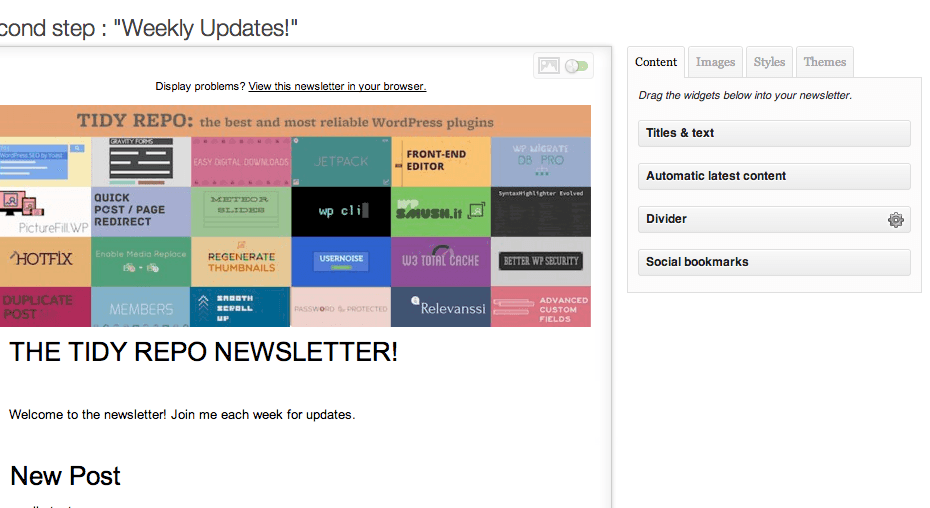
Drag content to the newsletter
The next tab, Styles, can be used to customize the look of your newsletter. You can select from any of the web safe fonts, and chose a color for each heading style, body copy, and links. Finally, the Themes tab is for those that want to give their newsletter a completely new look. There are over 30 free themes included with the plugin, and more included with the premium version. If you find one that matches your style, just select it and your newsletter’s look and feel will be automatically changed. Or, you can choose to create your own.
At the bottom of the page is an option to “Send Preview” which will send a test email to any email address, so you can get a sense of how it looks in your mail client.
When you are finished creating your template, click “Next Step” again to go to the next tab. Here you’ll just have to confirm all of your settings and make sure that your admin and reply to email are correct. Browse this info, and then click “Send” for Standard Newsletters, or “Activate Now” for recurring newsletters to send it out.
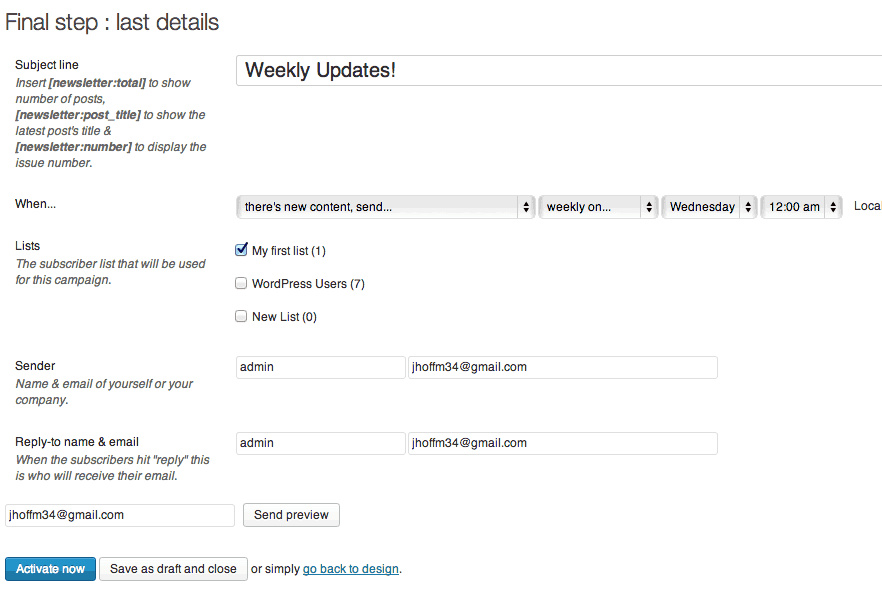
The final settings page
If you go to MailPoet -> Settings you will see a list of global settings for your newsletter. Most of these can be kept at their default, so I won’t go into too much detail. In the Basics tab, you can edit your basic information, and customize notifications and unsubscribe settings. The Send With and Advanced Tab have other global options for your newsletter, like who can create and edit them, and what service should be used to actually send emails out. Look these over to make sure everything is consistent with your site setup, but I’ve rarely found a reason to change anything.
The Signup Confirmation page has a textbox that allows you to customize what the confirmation will look that users receive after signing up for your newsletter. You can customize what the email they get will say, or turn this off altogether, and also customize the message that is displayed on the page after they have successfully submitted their email.
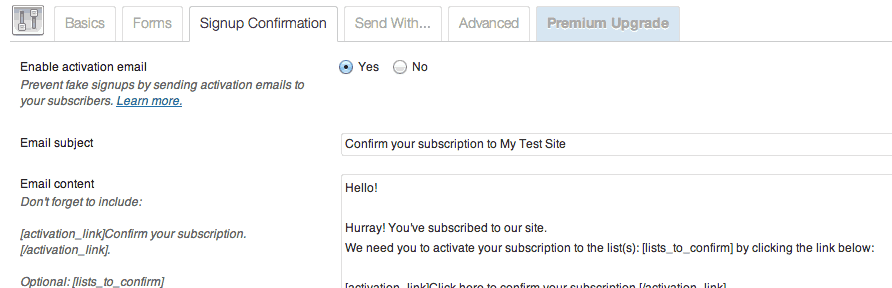
Customize your confirmation auto-responder
The last step is to add a subscribe signup to your site. There are a few different ways to do this. The first is to go to Appearance -> Widgets and drag the “MailPoet Subscription” box into a widgetized sidebar. The other ways to add them can be found on the Forms tab in Settings. You can either chose to edit an existing form or create a new one, by clicking the “Create a New Form” button at the top of this tab. This will bring you to a new drag and drop interface which is used to construct the form that users see on your site when they are signing up. Chose any of the content types from the right side of the page, and drag them into the form on the left to start building your form. You can drag in “List Selection” if you would like users to chose from several different newsletters, or “First Name” and “Last Name” to request this information. Each field can be marked as required and customized by hovering over it and clicking the “Edit” button. In the textarea after “After Submit…” enter in the text you would like users to automatically see after submission, then click Save. At the bottom, you will see links to add your form to any page using HTML, PHP, a shortcode or an iframe. The shortcode, for instance, will look like this:
[[wysija_form id=”1″]]
With the ID changed to whichever matches your form. The PHP will look something like this:
$widgetNL = new WYSIJA_NL_Widget(true);
echo $widgetNL->widget(array('form' => 1, 'form_type' => 'php'));
With again the ‘form’ parameter changed to match the ID of your desired form. I would use a shortcode or PHP in your template files if at all possible, for performance reasons, but you can also choose to include HTML or an iframe without much of a hit. You can also do cool things like adding your subscription form as a popup if you want to.
Once the form is added to your site, they will be automatically listed in your Subscribers section and can be managed from there.
Costs, Caveats, Etc.
MailPoet has a free and premium version. The free version is fully functional but has a limit of 2000 subscribers, and only basic access to statistics. The premium version includes more subscribers, more themes, better statistics (and integration with Google Analytics) and priority support. If you are having a problem with the plugin, however, you can visit MailPoet’s dedicated support site for help, free or premium.