
A pretty simple and useful plugin, Page Template Dashboard lets see you what templates your…
In a nutshell, Gravity Forms allows you to add forms to your website, complete with a couple of dozen form field types, auto-responders and admin notifications and basic stats on visits and conversion rate. Proper form submission is not the easiest page element to set up, and though a few great third-party services such as Wufoo and Typeform exist to ease your pain, Gravity Forms keeps things fairly painless and integrated.
What’s It Do?
Gravity Forms sets up a custom post type on your WordPress install called Forms which allows you to add and customize as many forms as you would like. You create new forms by simply creating a new one, selecting which fields you would like to include and filling in some basic details about submission and notifications.
Included with Gravity Forms is a fairly robust API to modify the form’s output, settings and hook into just about any step of the form submission process. You also have fairly basic syntax for including forms in your themes and a shortcode for including them in your post editor.
How’s It Work?
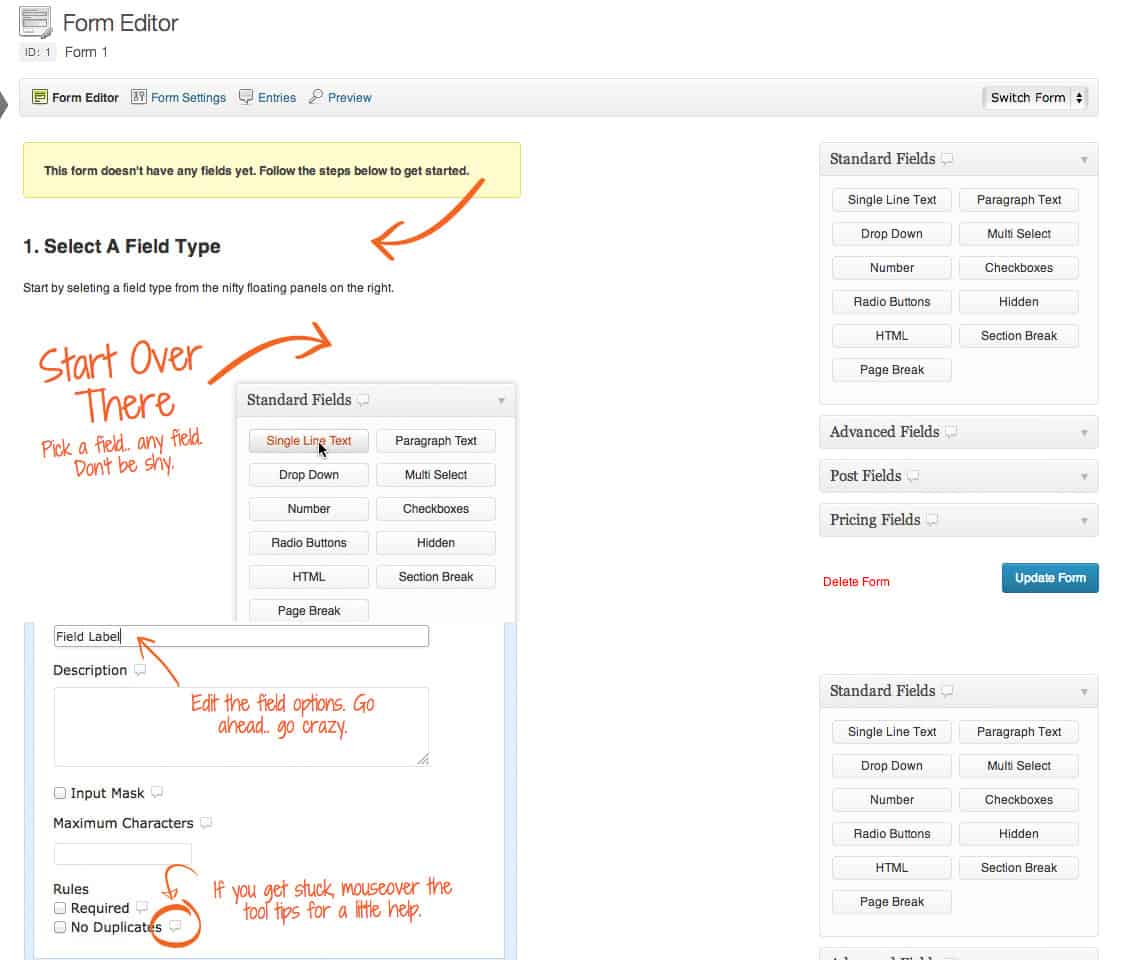
I am particularly fond of their welcome screen
Gravity Forms kind of scales based on the level of complexity that you need. If your goal is as simple as adding a new form to your website, then start by selecting New Form from the Form section in your admin panel. On the right side of your screen, you will see several fields that you can begin adding. Just drag them into your editor to add a field to your form.
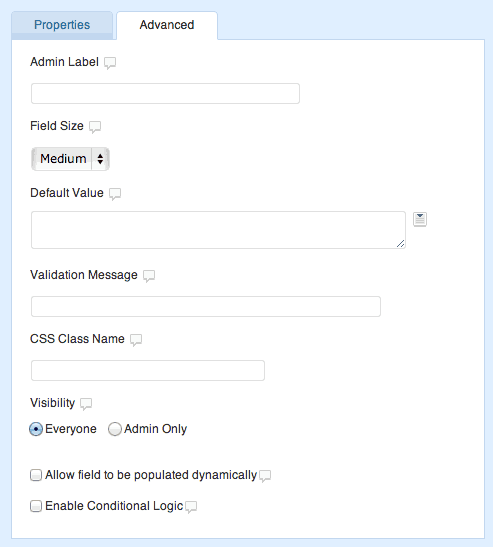
As you progress, you may notice some advanced options. For instance, in the Advanced panel of each field, you will see the ability to add CSS class names, or validation messages for certain field types, such as “Website.” These allow you to expand the functionality and style of your form, but for the most part are completely optional.
Advanced options for paragraph text
You may also notice the ability to add conditional logic. This simply means that certain fields will only become visible if certain conditions are met. If you have a dropdown with the options “Developer” and “Designer” then you can show or hide the text field for “GitHub ID” or “Dribbble Id” based on the selection. This might be a bit of a shoddy example, but hopefully, you get the idea.
Once you have finished adding your fields, select the Form Settings button to add confirmations and notifications. After a form is submitted, you can add confirmation text so that the user knows their submission was successful, or direct them to a new page altogether. Notifications are even more verbose. If there are several different people you’d like to send a notification too, depending on the input of certain fields, select the “Routing” option and choose your conditions and where to send each email.

Notification Screen
In addition to these basic options, Gravity Forms’ GUI provides you with the ability to extend it with add-ons, including Mail Chimp, Paypal, and several others, Import or Export forms from other sites, or edit global settings. I recommend you explore these options a bit.
You can add a form to your WordPress install in two ways. The first is with the gravity form shortcode in your post editor. You can define which form to output as well as some basic conditions all within the shortcode.
[gravityform id=1 title=false description=false ajax=true]
The second is to use the gravity_form function in your template files. This gives you a bit more control over the forms output but ties you to a template file.
<?php gravity_form($id_or_title, $display_title=true, $display_description=true,
$display_inactive=false, $field_values=null, $ajax=false, $tabindex); ?>
If you are a basic WordPress user, then the shortcode method is more than enough.
If you are a developer, then you may want to take a look at the Developer Docs. As I mentioned earlier, there is a whole host of ways to hook into or filter Gravity Forms’ output by adding a few customizable functions. If you need some more complexity out of your forms, it’s worth checking out.
Costs, Caveats, Etc.
Gravity Forms requires that you purchase an annual license from them. For just one site, it starts at $39 a year up to $199 a year for an unlimited number of sites. Included in this price is free updates, support and access to the Gravity Forms help forums. The higher up you go, the more features you get, so a full-priced developer license also includes all of their add-ons and priority support.
I’ve actually never needed to use their support, but I’ve browsed the forums and responses come fairly quickly. They are not as fast as other services I’ve seen, but you should be able to get your problem fixed within a couple of days.
Each update of Gravity Forms seems pretty big improvements to both their admin GUI and internal functions. They appear to be listening to their users, and that’s always a good sign.