Another one from Pippin Williamson, Sugar Events Calendar Lite allows you to easily set up…
In the past, I covered Sugar Events Calendar, which is a lightweight calendar management system. But, if you’re looking for an events calendar with more features, a sharper look and a bit more meat to it, The Events Calendar is the way to go.
What’s It Do?
The Events Calendar allows you to add a series of events in the WordPress admin using a custom post type. For each event, you can specify a description, time and date, Venue, Organizer, website, and a cost. You can also add featured images, categories, and tags to any events. Every time you input a new venue or organizer, they will be automatically saved so you can easily pull the information later for a new event.
The plugin then outputs this list of events to your site, at a URL of your choosing, in three forms: Day, Month and List. Day shows all events for the current day, List lists out all upcoming events, and Month shows a calendar view that users can scroll through. You can choose to limit your output to just one of these types, or select two or three and let the user decide how to view the content. Event detail pages also contain a lot more information organized together, with full Google Maps integration for the Event’s location.
The Events Calendar comes with a full set of styles associated with it, which should fit into most themes. However, if you want more control, you can choose to only theme it lightly and build from there, or output a skeleton stylesheet which only contains the bare minimum. You can also customize what is shown in the event lists and calendar, and output custom HTML before and after the template.
How’s It Work?
Keep in mind, The Events Calendar is a full event management system. It has add-ons which allow you to create recurring events, complex filters, to integrate with Facebook, Eventbrite, Shopp and other third-party services, and lots more advanced options. But the basic plugin will give you the full ability to create a nice looking events calendar and descriptions without too much effort. That’s what I’ll be going over here.
After you install and activate the plugin, it’s probably best to add your first event so you can see how everything works. Go to Events -> Add New to add your first event. Here, you can enter a title and description for your event, just like you would any other WordPress post. Below this, you will see a list of fields that are specific to events. You can start by adding the time and date of your event. If your event lasts all day, check the “All Day Event” box and simply choose the day.
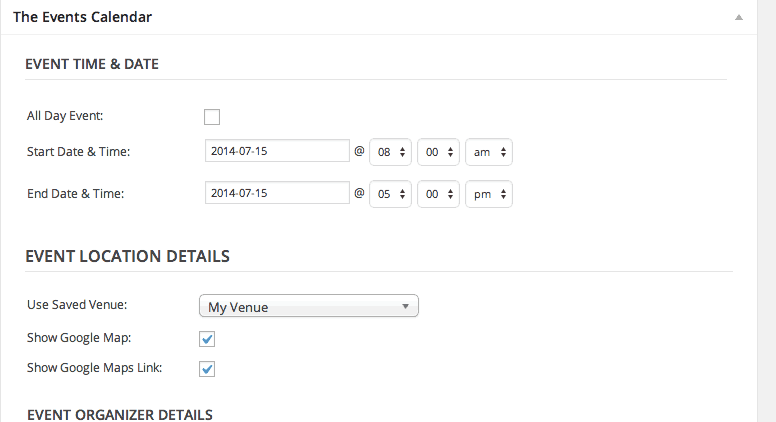
You can start by adding details for your event
Next, you can list the venue that the event will take place at. This includes the title, address, website and phone number of the location your event will take place at. Keep in mind, that every time you enter a new venue, it will be saved in your list of venues which you can access by going to Events -> Venues. You can also add new venues independent of events here if you would like to store them for later use. If you have a stored venue you would like to use, simply select it from the drop-down menu and all of the information will be filled out automatically. You can also choose whether or not to output a Google Map next to the Venue on the event’s detail page.
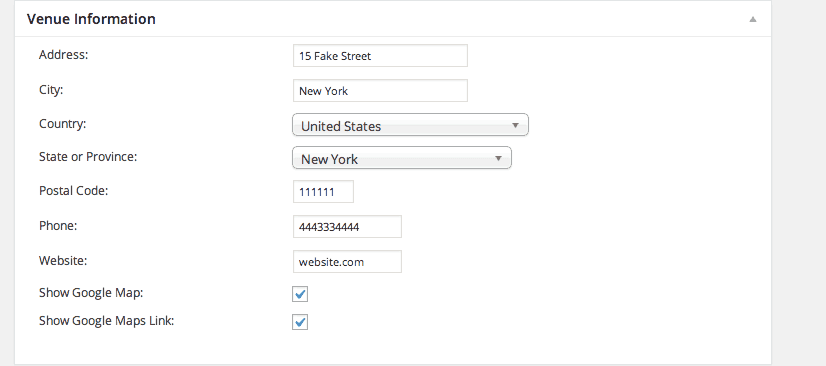
Venues can be saved and retrieved later
Below this is the “Organizer” section. This part is completely optional, but if you want to add an event organizer, fill in their name, phone, email, and website. Once again you can save and retrieve organizers by either entering them into an event or by visiting Events -> Organizers. Last up, you can enter in a website for the event if you wish, and assign it a cost. If you leave the cost blank, then this will simply be left out.
For any event, you can also add a list of metadata, such as tags, categories and a featured image just like you would any other post or page. Once again, you can see these tags by going to Events -> Tags and categories by going to Events -> Categories. Featured images will be listed alongside the listing of an event and on the event’s detail page.
After you have added a couple of events, you can see how it will look on your site by visiting: yoursite.com/events.

A list of upcoming events automatically output
Here you will see a list of your upcoming events, and a drop-down menu in the top right where you can select “Month” or calendar view and “Day” or single day view alongside “List” which just shows a list of all upcoming events. This might be enough for you, but to customize the way the plugin looks and feels, you can go to Events -> Settings.
The first page of Settings will just have some general options. For instance, you can choose how many events to show on each page of your events list, toggle javascript functionality on and off, and choose whether or not to include event details alongside other posts in the main loop. You can also choose a slug or URL for your main events page, and single event pages, as well as some custom options regarding formats. Towards the bottom, you can also disable Google Maps functionality outright by unchecking “Enable Google Maps”, or customize its zoom level.
Control the look and feel of your events list
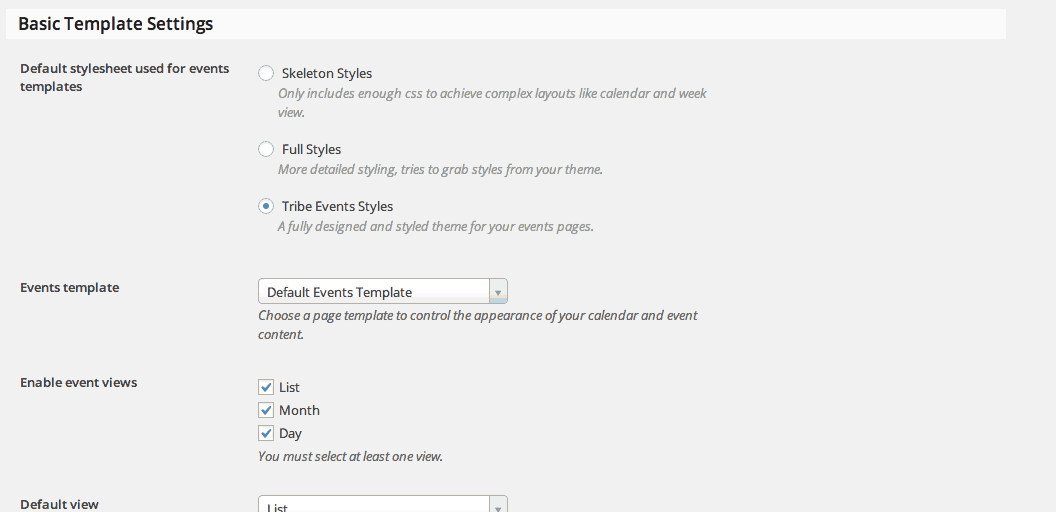
If you click the “Display” tab at the top of the page, you can control how your events are output. First, you can choose which styles to use “Skeleton,” “Full” or “Tribe Events.” Skeleton only includes the most basic CSS and will require heavy customization for you, which is good if you want to theme it from scratch. Full has a little bit more, and may just need a bit of tweaking. The tribe can still be tweaked but will include a fully styled list and calendar view for you to use. You can choose a template, and choose a default list view (List, Day or Month). You can also enable a view altogether by unchecking the box next to it. Below this are some basic date format settings if you want to change the style that dates are output. And at the very bottom are two text areas where you can insert custom HTML to be inserted before or after the template if you want to customize the header and footer.
That’s about the tip of the iceberg of what you can do with this plugin, but it’s enough to get you started.