Out of the box, the way to sort items in WordPress is to affect the…
WordPress has had image gallery functionality for a little while, but it basically only allows you to arrange images in an ordered grid. And a lot of image gallery plugins out there do far too much for the average user. Easy Image Gallery adds a few useful functions to your WordPress gallery and not too much else.
What’s It Do?
Easy Image Gallery gives you the ability to create galleries in your posts or pages using a meta box and the default WordPress media uploader. Images can be ordered with a drag and drop interface, and are shown with either a shortcode or at the bottom of the post. The plugin integrates two lightbox plugins, and images can be easily sorted through, expanded, and linked to larger versions of themselves making for a simple, elegant image gallery.
It’s also responsive if your theme is, and mobile-friendly and external CSS and Javascript files are only loaded on pages where they are needed, keeping it lightweight.
The developer prides the plugin on being “developer-friendly” and although the documentation is a little lacking right now, there are plenty of filters that can be used to modify CSS, HTML output, and lightbox functionality.
How’s It Work?
When you install and activate the plugin, there will be a new menu option under Plugins -> Easy Image Gallery. In here, you will see a drop-down menu for “Lightbox,” where you can select which lightbox plugin you want to use, fancyBox or prettyPhoto. It will also have a list of post types on your WordPress install. Select the post types that you want to enable the gallery functionality on and select “Save Changes.”
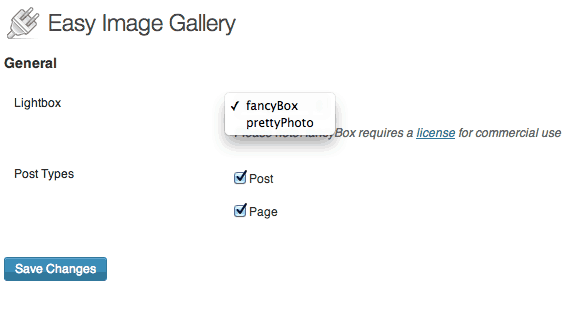
Easy Image Gallery settings
The next thing to do is visit Settings -> Media and check that your thumbnail size. Easy Image Gallery will use this as the size for displaying images in a gallery, similar to how the WordPress image gallery works. By default, this is 150px x 150px, but change this size to whatever you want. Remember, these thumbnails will link to larger versions of the images in a lightbox so make sure that you keep it a suitable thumbnail size.
When you visit any post or page that the plugin is enabled on you will see a new meta box at the bottom labeled “Image Gallery.” This is how you will add images to your gallery. There is only one option, “Link images to larger sizes.” If you uncheck this link, then the lightbox will be turned off and thumbnails will simply be presented in a grid with just thumbnails.
Click the “Add gallery images” link to start adding images. You will be brought to the WordPress media uploader where you can add all of the images you want to include in your gallery. You can also use this to upload new images from your computer. Every time you add an image, it will be added to the meta box in the order that you uploaded it. To change the order of the images in the gallery simply drag the images around and place them in the meta box how you want them displayed. There is no limit to how many images can be included in a gallery as far as I can tell.
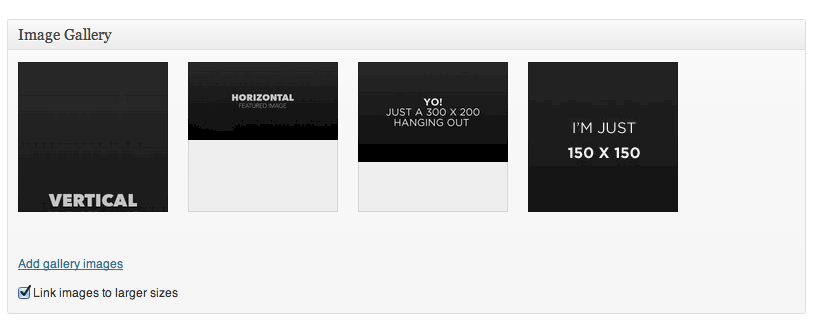
Add whatever images you want in the provided meta box
After you’ve uploaded all the images, you can simply hit “Publish” or “Update” on your post and the gallery will automatically be added to the bottom of your post or page with either a fancyBox or prettyPhoto implementation, based on your settings. If you want to place the gallery somewhere other then the bottom of your page, however, you can use the plugin’s shortcode:[easy_image_gallery] If you place this shortcode anywhere in your content area, then the gallery will be moved to that location instead of at the bottom of the post.

Image Gallery… easy
You can also use a function to include the gallery in your template’s PHP files. If you chose to do this, you need to also make sure to remove the filter which automatically places the gallery at the bottom of the page. In your template file place this code:
<?php if( function_exists( 'easy_image_gallery' ) ) {
    echo easy_image_gallery();
}

?>
Then open up your functions.php file and insert:
remove_filter( 'the_content', 'easy_image_gallery_append_to_content' );
Keep in mind, if you add this filter then all automatic placement of the gallery will be removed on posts or pages, so you will need to implement the gallery with either the template a function or shortcode in order to see the gallery at all. Only use this method if you need to.
There are also a few ways to hook into the plugin to modify its output. For instance, the easy_image_gallery filter can be used to change the HTML output of the plugin. You will have to first remove the filter and then add in your own custom version. You can also add your own custom Lightbox plugin to the output and have it included in the plugin options, for instance, color box. In order to do so first add this PHP code to your functions.php file.
function my_theme_easy_image_gallery_lightbox( $lightboxes ) {
    // the option that is saved to the database, and the label that appears in the select menu
    $lightboxes['colorbox'] = 'Colorbox';
    return $lightboxes;
}
add_filter( 'easy_image_gallery_lightbox', 'my_theme_easy_image_gallery_lightbox' );
This will add the colorbox option to your settings page. Next, you have to queue in the required javascript and CSS files so that they can be added to the lightbox when it is used. Under the previous code, add:
function my_theme_easy_image_gallery_scripts() {

   	$lightbox = function_exists( 'easy_image_gallery_get_lightbox' ) ? easy_image_gallery_get_lightbox() : '';

   	if ( 'colorbox' == $lightbox ) {
   		wp_enqueue_script( 'colorbox-js', get_stylesheet_directory_uri() . '/colorbox/jquery.colorbox-min.js',  array( 'jquery' ), '1.4.26', true );
   		wp_enqueue_style( 'colorbox-css', get_stylesheet_directory_uri() . '/colorbox/colorbox.css', '', '1.4.26', 'screen' );
   	}

}
add_action( 'easy_image_gallery_scripts', 'my_theme_easy_image_gallery_scripts' );
Making sure to add a “colorbox” folder with the required scripts. Next, you can add the code that will be needed to initialize the jQuery plugin. This will only be added to pages which have an image gallery if you use the easy_image_gallery_js filter. For colorbox that would be:
function my_theme_easy_image_gallery_js() {

    $lightbox = function_exists( 'easy_image_gallery_get_lightbox' ) ? easy_image_gallery_get_lightbox() : '';

	if ( 'colorbox' == $lightbox ) { ?>

		<script>
			jQuery(document).ready(function() {
			  jQuery("a[rel^='colorbox']").colorbox();
			});
		</script>

	<?php }

}
add_action( 'easy_image_gallery_js', 'my_theme_easy_image_gallery_js' );
Of course, this series of scripts will have to be modified depending on what lightbox plugin you are using, but implementation will remain basically the same.
Easy Image Gallery is meant to be simple and easily extendable so if you are a developer it’s best to dig into the code and see what you can add if you need to make any changes.
Costs, Caveats, Etc.
As far as I can tell, Easy Image Gallery implements lightbox and gallery functionality the way it should be, conditionally and simply. There is, of course, a performance hit when jQuery plugins are added to your site but these are fairly small Javascript and CSS files, and will only be added when they are needed.
The plugin is completely free and is updated routinely. The developer has answered basically every question on the support forums, so head there if you are having a problem.

