Site speed is dependent upon a lot of different factors. On the front-end, there are…
I’ve reviewed W3 Total Cache here before, but as I mentioned, it can be pretty advanced. Think of WP Super Cache as the easy to use, easy to set-up caching option, with plenty of customizable features. If your site has a ton of dynamic features or operates on the level of a web app, then this isn’t for you. But for most sites, it will be just the thing.
What’s It Do?
WP Super Cache speeds up your site by creating static versions of all of your dynamic pages, then storing them until they are updated. As long as a user is not logged in, or hasn’t left a comment, they will be delivered a superfast, static version of each page on your site, which will generally speed things up quite a bit and decrease the load on your server.
The plugin comes with advanced functionality and configuration options. You can choose which caching method to use, how often to update your cache, integrate with your CDN of choice, and enable “Lock Down” mode which will get your site ready for a huge surge of traffic. The plugin also will update your .htaccess file automatically, given the right permissions, and has debugging options available if you are having a problem.
How’s It Work?
Even before installing the plugin, you’ll want to make sure that your WordPress site is configured properly. First, you’ll want to set up custom permalinks. To do so, visit Settings -> Permalinks and click on any option other than the Default (I’d recommend Post Name for SEO purposes) and click the “Save Changes” button.
Once you have done this, you can install and activate the WP Super Cache plugin. If everything is set up right, then you’ll see a link to go to the plugin’s settings page to configure caching. However, you may be prompted with some additional steps.
If you see an error that says advanced-cache.php cannot be created, then you’ll have to change the permissions of your wp-content folder to 777, then try activating the plugin again. Make sure that you change permissions back to 755 after you are done. If you do not know how to do this, contact your web host, or refer to John Saddington’s guide for a little more info.
You might also get an error that WP_CACHE is not enabled. If this is the case, open up your wp-config.php file and add this line to it:
define ('WP_CACHE', true)
Then save the file to your server and try and activate the plugin again.
There will be a new option in your admin panel under Settings -> WP Super Cache. Click here to set up the plugin.
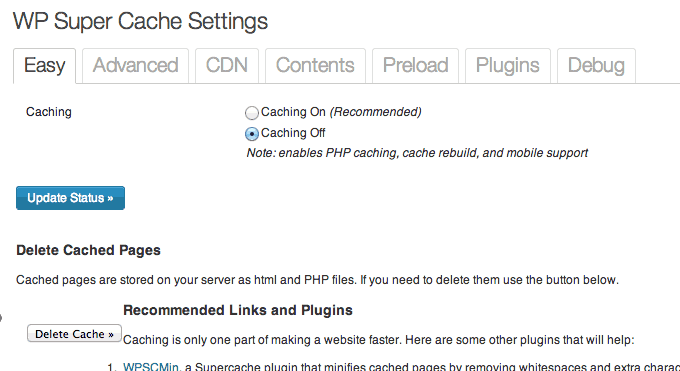
Turn caching on and off with one click
The first screen that you will see has only one option. You can either select “Caching On” or “Caching Off.” To turn on the plugin, select the “Caching On” button and select Update Status. If you’d like to make sure everything is working properly before you turn on the plugin, you can also try the “Test Cache” button which will make sure that your WordPress install is compatible with WP Super Cache.
In a lot of cases, this may be all you have to do. But it’s worth clicking on the other tabs to get a little more fine-grained control. The Advanced tab has options to expand the functionality of the plugin. At the top, you’ll see an option to chose from three different kinds of caching.
- Mod_Rewrite uses Apache rewrite rules to cache files. It is the probably the quickest method, but also the hardest to set-up. If you know how to edit your .htaccess file and have a good sense of your server setup, you can enable this. Otherwise, use
- PHP To Serve Cache Files is really almost as quick as mod_rewrite but doesn’t require any further setup. Recommended for beginners
- Legacy Caching in most cases, should not be selected.
Below these options, you will see a list of Miscellaneous and Advanced options to chose from. These will change quite a bit depending on the needs of your site, but in general, it’s probably wise to check the “Compress Pages” box, the “304 Not Modified browser caching” box (if you are using mod_rewrite), and the “dynamic caching” box. If you have a separate mobile site, you can also check off “Mobile Device Support.” Look through these options and see if there is anything else that might fit your needs. If you don’t understand a step, it’s probably best to leave it unchecked. Once you are finished with these options, click Update Status and your cache will be rebuilt.

Some basic advanced options
Next is Mod_Rewrite Rules. By default, WP Super Cache will automatically change your .htaccess file if you have mod_rewrite caching enabled. However, if it is unable to do so then it will list necessary code in this section. Simple copy and paste this code into your .htaccess file and upload it back up to the server. If you are having problems with this, please use PHP caching instead.
Below this is a section for Garbage Collection. This specifies how long cached files should remain in your system before they are trashed and re-cached. You can either set this timeout on a timer, so that it happens every scheduled amount of seconds or on a clock so that it happens the same time every day. In general, the Timer method will probably work fine. The plugin suggests 3600 seconds as a good starting point, and I would tend to agree. But if your content doesn’t change all that often, then you can increase that number even more.
The rest of the page has very specific options for customization. I’ve never really had to tweak these, so leaving them at the default settings should be just fine 99% of the time. The only other feature to note is the “Enable Lock Down” button. If you are expecting a huge surge in traffic, like very very big, you can turn this on. Basically, pages will not be refreshed, even if new comments are posted. This means that users coming to your site will not get up to date comments, but it will also stop the plugin from re-caching a page over and over if you are expecting lots of comments to come in. I’ve never had a site that needed to make use of this, but it could be helpful for some of you.
The next tab is CDN. If you are using a Content Delivery Network like Amazon or MaxCDN, then you can enter the URL of your CDN in the text field provided, so that offsite static files are also cached. Make sure to enter the URL address without a trailing slash. You can also choose filetypes to exclude in the “Exclude if substring” textbox and add any additional CNAMES (URL aliases) provided by your CDN host. This plugin will make some pretty large changes to your sites media and attachment links, so make sure that you test out the CDN URL before enabling this option. If you are finding that you have problems with it, then you can disable it and leave CDN caching to be handled by your host.
Next up is the Contents page. This will give you a rundown of cached files on your site. There are also two buttons to “Delete Cache” or “Delete Expired.” If you have updated something on your site, but you don’t see the change taking effect, try the “Delete Expired” button. If changes still aren’t appearing, try the “Delete Cache” button. Nine times out of ten, this will solve your problem.
Preload is the next tab. By default, cache files are created the first time a user comes to a page. Enabling Preload mode will automatically create static files of every page on your site, even before a user reaches them. If your site has thousands of posts, this may be too much for your server to handle, but otherwise, you can enable it. The plugin developer suggests that there are SEO advantages here, but I can’t speak to how much. To enable Preload Mode, just select the box labeled “Preload Mode.” The other settings can be left at their default unless you only want to preload a certain amount of posts on your site. If you do, select the number of posts you want to cache from the “Preload X posts” drop-down. This will automatically cache the newest files from your site. When files are preloaded, they are brought in to the queue in chunks so that your server is not overloaded all at once. When you are finished with the settings click on the “Preload Cache Now” button.
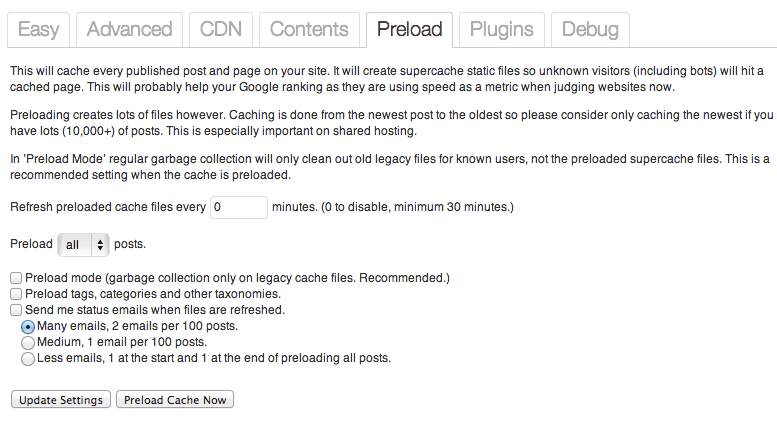
Preload should be used to cache all pages at once
The Plugin and Debug tabs are geared more for developers and require more space then I have here to include. If you’d like to know more about the plugin’s API, and how to better integrate it with your site, you can view the developer documentation, which contains information about how to use WP Super Cache with plugins, and a list of filters, hooks and functions for you to use. There are plenty of ways to expand the plugin, so make sure to give it a read if you are a developer.
Keep in mind, this is, at best, a cursory introduction to WP Super Cache. The best way to find out more is to simply explore the plugin, or check out the FAQ for lots more information.