A pretty simple and useful plugin, Page Template Dashboard lets see you what templates your…
In the past, I reviewed Testimonials Widget, which allows you to create small testimonials and display them with a shortcode or in a widget. Testimonials by WooThemes replicates some of the same functionality, but pares it down even more, if you are looking for something simple that you can style from scratch.
What’s It Do?
Testimonials adds a new custom post type to your WordPress install that allows you to add quick and simple testimonials to your site, with support for categories and featured images. You can then display the testimonials on your site using a function, template tag or shortcode. Testimonials purposely doesn’t add any styling to the output Testimonials but marks up the data in a meaningful and semantic way so that you can style it yourself.
How’s It Work?
When you install and activate the plugin, you can start adding new testimonials right away by visiting the new section in your admin panel with the quote icon, Testimonials -> Add New. This will bring you to the testimonial editor, which will look exactly like your standard WordPress editor.
Add in the name of the person who’s testimonial you are adding at the top of the page, then add the actual text in the text area below that. Below the text editor, you will see a meta box with a few additional fields. You can enter the email address of the testimonial author if you want to automatically pull in their gravatar and show it next to the testimonial output. You can also enter a byline (like a job title) and a URL to link to for the testimonial author.
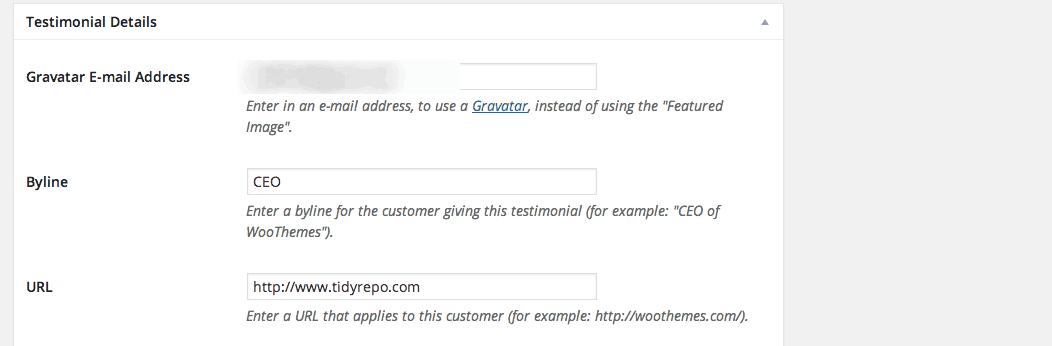
Add a few text fields specifically for testimonials
On the right sidebar, you will see an option to create a new category, or add the testimonial to an existing category. This can be useful for outputting the testimonial later, as you can choose to output testimonials from a single category only. You can also add a featured image to any testimonial. Keep in mind though, if you entered an email address in the provided text field, then a gravatar will be pulled from this address, and will show instead of the featured image. Only if an email address is not provided, or a gravatar cannot be found, will the featured image be displayed next to the author’s name. Add as many individual testimonials as you would like, and group them together.
The next step is to actually output these testimonials. There are three ways that you can do this. The first is using a do_action(); function:
do_action( 'woothemes_testimonials', array('title' => 'Testimonials', 'before_title' => '<h1>', 'after_title' => '</h1>') );
You can choose to add this to any template page, or you can include this in a callback function in functions.php or in a plugin. The do_action hook gives you a little more versatility than normal in terms of where it can be placed. You will also notice that I included an array with a few parameters to add a proper title to the beginning of the testimonial list. For a full list of parameters you can use, visit the plugin’s usage section.
If you are placing your testimonials directly in a template PHP file, you can also use a template tag:
woothemes_testimonials( array( 'limit' => 10, 'size' => 100 ) );
Again, the parameters for the plugin are placed in an array. This time we are saying that we want to show a maximum of 10 testimonials. The default is 5. The “size” parameters specify the width, in pixels, of the gravatar in the featured image that will appear next to an authors name, in this case, 100px.
Your last option is to use a shortcode on any post or page:
[woothemes_testimonials order="ASC" orderby="title" category="2"]
Parameters for the shortcode should be included separated by a space. In this instance, I chose to show the testimonials in ascending order, ordered by title, from category 2.
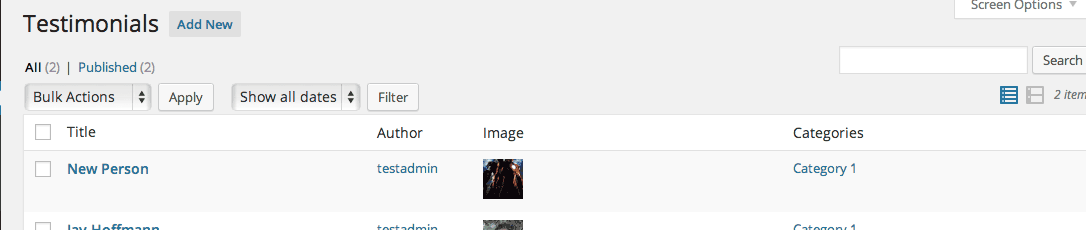
View all of your testimonials in one place
The testimonials displayed on your site will have no external styling applied to it. Without any help from you, it will probably look like a simple, left-aligned list of quotes, with an author tag, the featured image or gravatar, and a link if you choose to include it.
However, the HTML output is semantic, including Schema.org microformat information and wrapped in appropriate blockquote and cite HTML tags. There are also unique classes and IDs added to each element so that it can be easily styled in your own CSS stylesheet. This will save you an external HTTP request and make things run a bit smoother. I won’t go into the details of how to style the list, you simply need to take a look at the HTML and target the right CSS selectors. For those curious, though, the plugin will output your testimonials in a list that looks like this:
<div class="widget widget_woothemes_testimonials">
	<h2><!-- Title --></h2>

	<div class="testimonials component effect-fade">
		<div class="testimonials-list">
			<div id="quote-1265" class="quote first" itemprop="review" itemscope="" itemtype="http://schema.org/Review">
                        <blockquote class="testimonials-text" itemprop="reviewBody"><p><!-- Testimonial Text --></p>
			</blockquote><img alt="" src="<!-- gravatar -->" class="avatar avatar-50 photo" height="50" width="50">
			<cite class="author" itemprop="author" itemscope="" itemtype="http://schema.org/Person">
				<span itemprop="name"><!-- Author --></span>
				<span class="title" itemprop="jobTitle"><!--/.title--></span>
 				<span class="url"><a href="http://www.google.com" itemprop="url"><!-- Link --></a></span>
			</cite>
			</div>

                 <!-- More Testimonials -->

		</div><!--/.testimonials-list-->
		<div class="fix"></div>
	</div><!--/.testimonials-->
</div>
You can use this as a general outline as you are moving through and editing the CSS for your testimonials. This should be a fairly straightforward procedure.
Costs, Caveats, Etc.
As usual, WooThemes puts an emphasis on simplicity and performance in their plugin. It may require a bit more effort for you to get the styling right, but you have full control over the plugin’s output, with absolutely no performance drawbacks. The documentation for the plugin has plenty of information on how to get started, but you can visit the support forums if you run into a problem.
The code is also hosted on GitHub if you are interested in contributing to its development.