
When building sites, you occasionally need to create small blocks of content that can be…
Twitter Cards are summary’s linked to a URL that appears in a Twitter Timeline. They can display a picture and short descriptions of the URL’s content, making the viewing experience for users a little nicer. To set them up on your own site, however, can be a bit of a hassle. JM Twitter Cards takes care of this work for you.
What’s It Do?
In order to set up Twitter cards, you need to include some metadata parameters to the section of your HTML. If you don’t know what this means, don’t worry. JM Twitter Cards adds this automatically for you, using data from your posts and pages, such as your SEO title, featured image and excerpt. After the plugin is set up, Twitter cards will begin working for you when they are linked to on Twitter, so people will see small summary’s attached to your posts. JM Twitter Cards also supports Gallery Cards, Product Cards, Photo Cards and Player Cards, each of which can be used for different content types (more on that later). You can also customize the Twitter cards on a post by post basis, or use default settings to create Twitter Cards for your posts and pages automatically.
How’s It Work?
After you install and activate the plugin, you will have to set it up. If you are looking for immediate help, you can visit JM Twitter Cards -> Tutorial for a full video tutorial on how to get started.
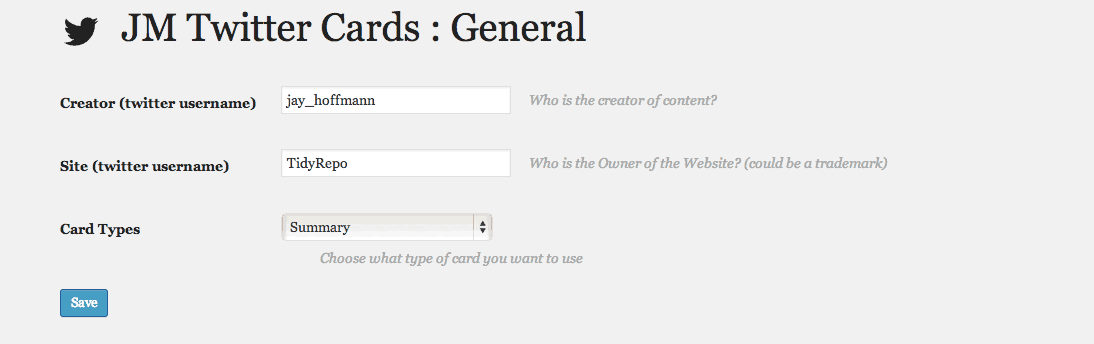
But for now, go to JM Twitter Cards -> General and enter in your Twitter handle, the Twitter handle for the Site (this one is optional, only if it is different), and choose which card type you want to use by default from the drop-down menu. You can select.
- Summary – A summary card will append a small text description to Twitter links. This will be automatically pulled from your post’s “Excerpt”
- The summary below Large Image – Will add an image to the text summary. The plugin uses your featured image for this and can be customized.
- Photo – This will put more of an emphasis on your photo, putting it front and center underneath a tweet, with only the title below it.
- Application – This should only be used if the page is meant to have information about a native mobile app. Chances are, you won’t be using this type
If you want more information about how Twitter Cards look and work, visit Twitter’s developer documentation.
Start with some basic options
Your next step will be to set up basic image options by going to JM Twitter Cards -> Images. Here you will see that the default fallback image, meaning what is displayed when no image can be found, is the twitter logo. You can change this to whatever you like using the “Add or Upload File” button, and then choosing a width and height for this fallback image. Then, from the “Define specific size for twitter: image display” choose a baseline image size to use. Twitter will use this to maintain an aspect ratio, so your final image may not be this exact size but will keep its proportions. The plugin has listed a few common sizes, so just choose the option that suits you best, or leave it at its default.
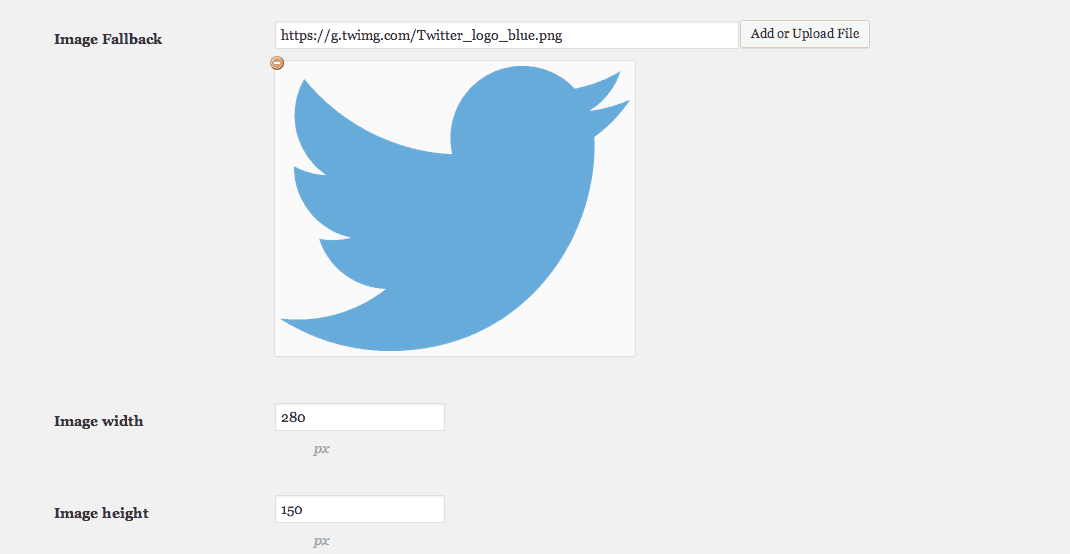
You can either use the default fallback or upload your own
Next, you can go to JM Twitter Cards -> Custom Fields. Chances are you won’t need to touch this. However, if you’d like, you can have the plugin pull your posts and pages title and description from a custom field that you have set-up instead of the default. Just enter the name of the custom fields in the provided text boxes to get that linked up. Keep in mind, if you have an SEO Plugin like WordPress SEO by Yoast or All in One SEO, then titles and descriptions will be automatically pulled from this.
The “robots.txt” option you can skip, and go to JM Twitter Cards -> Home settings. Here you can enter the description that should be used when the homepage of your site is tweeted out. Next, go to JM Twitter Cards -> Meta Box and choose from the drop-down menu whether you would like to “Display” or “Hide” the Twitter Card meta box in the post editor. If you choose to hide this, then you will not be able to customize Twitter Cards on a post by post basis, and every post and page will use the default settings.
Next up is JM Twitter Cards -> Multi Author. If you are running a site with multiple authors for your posts and would like to allow different authors to use their own Twitter handles, change the “Add a field in profiles for author” option to yes. This will add a meta box for authors to optionally insert their Twitter usernames. Alternatively, you can keep this option at “no” and change the “Meta key Twitter” to any custom field, to pull the data from there instead of from the default settings. The last option is for Deep Linking but that is a bit beyond the scope of this tutorial. If you want more info on Deep Linking, read the Twitter documentation.
Once this is all set-up, then Twitter Cards will begin working on your posts and pages. You can use the Twitter Validator to make sure that everything is working as it should.
If you chose to leave the meta box in the post editor, then you can also change the Twitter Card display for each individual post. Simply edit an existing post or page, and scroll to the bottom of the page to see the “Twitter Cards” box. For each post, you can choose a card type and set specific options. The card types are the same as above, with three additional ones.
- Product – Meant for retail items, will show a small image next to a description and specific labels. If you choose this option, fill out the “key data” and “key label” with data like the Item price, country of origin, etc.
- Player – The player card can be used for streaming actual multimedia, primarily video or audio. This is done by embedding an iFrame into the tweet from an HTTPS protocol. Something like Vine. If you do choose to use this option, make sure you enter the URL of your iframe, and the player’s height and width.
- Gallery – For showing multiple pictures or gallery posts. If you use the gallery shortcode in your post, then a Gallery card will be created automatically.
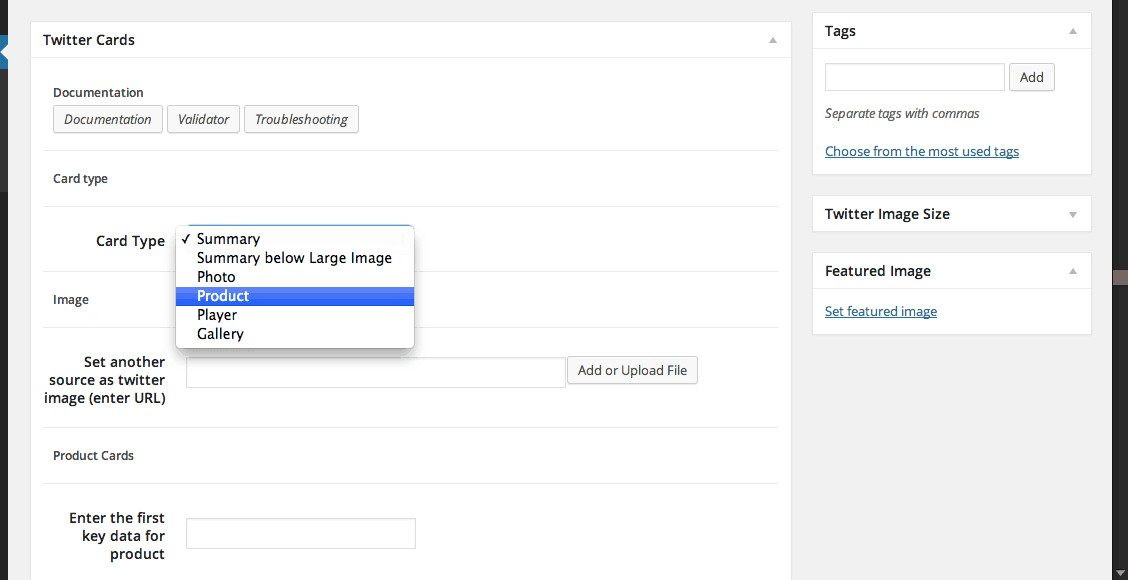
Each post can be customized easily
Once you have selected your card type and added the appropriate options, you simply need to update or save the post. To see your Twitter Cards in action, open up the source code of your post, and look at the metadata in the section. You will see the appropriate metadata Twitter needs.
Costs, Caveats, Etc.
JM Twitter Cards just went through a major update, and there are certainly more features to come. If you have a new feature or would like some help with the plugin, you can visit the support forums where the plugin developer is very active. And if you really like the plugin, you can always donate to the effort.