My main goal at Tidy Repo is to protect you from all the problems that…
BackupBuddy is the only plugin you need to give you peace of mind when it comes to site backups. Unlike VaultPress, which we’ve covered here before, BackupBuddy puts a real emphasis on ensuring that it is easy to manage your backups, store in remote locations, and very, very easy to restore your site at any time or migrate to a new server.
If you want to dive in quickly, I recorded a video that will walk you through how to set up the plugin. If you want to learn more, keep reading:
Getting Set Up
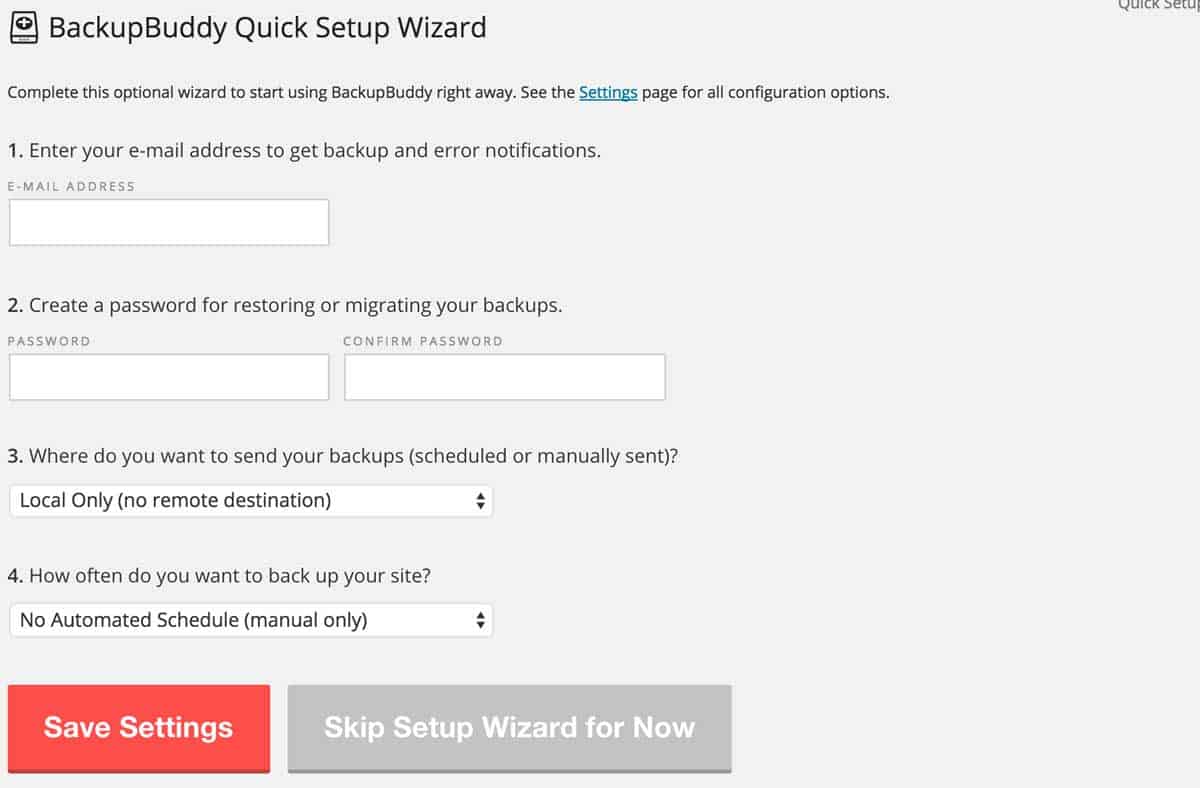
The first time you activate BackupBuddy, you will notice that you are taken to their Backup Wizard. Basically, if you enter your email, a unique password, a schedule, and set up a remote location, you can get your first backup off the ground very quickly. If you’re looking for the path of least resistance, that’s the easiest way to go. But there is also a lot more than you can customize if you choose to dive into the plugin.
One of the first things you’ll notice if you go to BackupBuddy -> Backups in the WordPress admin, is that there are two backup profiles already set up for you. One is for your full site, meaning your site files and database, and the other is for just your database. Clicking on either one of these profiles will begin a backup manually, right away. But the real strength of the plugin is that these profiles can be customized. The gear icon next to each one of your profiles will take you to a modal box where you can set up exactly what is you want to backup. For full backups, you can even choose exactly which files and database columns the plugin should pay attention to. And for each profile, you can set up a default location, local or remote, to store the backup. Of course, you can also create your own custom profile, by clicking the plus icon, specifying your backup and choosing your settings.
All of these settings, by the way, have global defaults. To access these you can go to BackupBuddy -> Settings where you will see some details about specific backups, as well as some basic configuration options. For instance, you can set an ImportBuddy password (which I’ll go over in a bit), which will be used by default. Most of the settings in this section can be overridden on an individual basis, but it is good to go through them and make sure everything is set correctly.

Basic settings, specify which files to exclude
Why set up multiple profiles? There are a few reasons. You probably have a good reason to backup your database, which changes rapidly, on a more regular basis then you do the rest of your site, which is less likely to change. You also might want to send a lean version of your backup to one remote location, and your full backup somewhere else. This is all possible thanks to profiles.
Storing and Automating your Backups
By default, BackupBuddy will store your backups on your local server, where WordPress is installed. This is generally not a great idea since you won’t have access to those files if something goes wrong with your whole server, so BackupBuddy encourages you to set up a remote location for your backups to be stored. The plugin interfaces with a number of cloud storage options, including Amazon AWS, Dropbox, Rackspace, and it’s own proprietary cloud storage solution, BackupBuddy Stash, which is by far the simplest to set up. You can also pick from a few other options, such as Email, FTP, and SFTP if you have a custom solution for storage.
It definitely pays to set up remote locations, which you can do by visiting BackupBuddy -> Remote Locations and clicking “Add New”. Each service has its own set of instructions, and the plugin will guide you through how to get everything up and running. You can set up as many locations as you want, and then hook them up to backup profiles or schedules to get the exact flow you want.
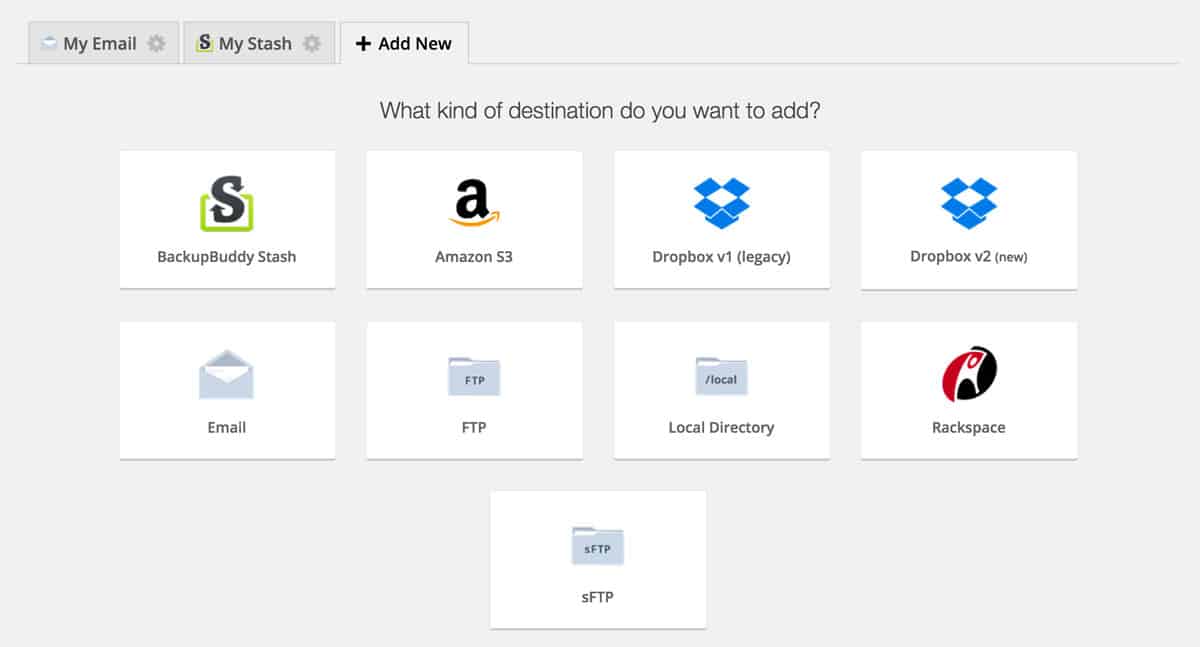
Add from a list of remote locations to store your backup
The whole point of a good backup solution is that it runs in the background, and is there when you need it. Fortunately, it’s easy to set up a schedule for your backups with just a few clicks by hopping over to BackupBuddy -> Schedules. From there, you really just need to set up how often you want to run your backups, which profile to pull from, add some remote locations and schedule your first run. After that everything will run seamlessly for you, while you keep going to your site. And you can set up multiple schedules, each recurring at different intervals for your profiles.
Restoring and Migrating
Restoring your site quickly to a previous backup, either from your database or site files, really couldn’t be easier. You just go to BackupBuddy -> Restore/Migrate, navigate through your list of backups, and chose either “Browse and Restore Files” or “Database Rollback”. The former allows you to select exactly which of your site files you want to reset back to a previous backup. The latter will rollback your whole database.
This works great for something quick when you just need to correct a mistake or rollback past some content that may have been harmful. But if you are restoring your whole site, or migrating your site to another server, then you will need to use ImportBuddy. At its core, ImportBuddy is really just a single PHP file that you can download from the Restore/Migrate page. When you do, you’ll be prompted to enter a password or use the default one you set up before. To actually use ImportBuddy though, you need to upload the file and a zip file of your backup to a clean server. By that I mean a server that has nothing installed it, not even WordPress. BackupBuddy will take care of everything for you. After you’ve uploaded the right files, you can go to “http://yoursite.com/importbuddy.php” and follow the instructions. In no time at all, you’ll have a site that is fully restored or migrated over from the site you uploaded. It really is that easy, and works with almost zero friction. The ImportBuddy process is really what gives BackupBuddy the edge and gives me some confidence that it works when it needs to.
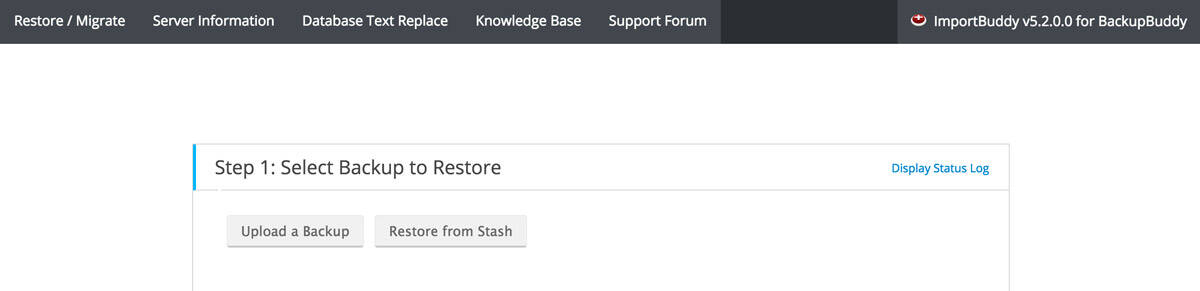
ImportBuddy makes migrations extremely simple
Server Tools, Security, and a Whole Lot More
On top of your basic backup management, BackupBuddy also has a few other tools that you can use. For instance, Server Tools will let you know all about your server and will clue you in if something is not configured right, or if there is something wrong with your database. You can also get a full list of Cron jobs running on your server. Malware Scan is another tool the plugin provides, which will scan through your site and look for potential problems. I’m not doing it justice by just giving it a mention here, but this is a long review.
iThemes is a solid company. They build great products, and BackupBuddy is one of their oldest. They’re constantly improving it, and always putting security and ease of use first. It will take you no time at all to get it set up, and once you do, you’ll never have to worry about it again.