
If you're looking to set up an intranet, staging site, or an otherwise semi-restricted site,…
Caching is a fantastically easy and cheap way of speeding up your WordPress website but most caching plugins are complicated and need some expert knowledge in order to set-up. Gator Cache takes one of the simplest forms of caching – page caching – and makes it very easy. With this plugin, you can make your site instantly faster with just a few clicks.
This is an intro to WordPress caching using Gator Cache.
What’s it Do?
When putting together a website, speed should be one of your main considerations. If your website is slow then you might be turning away potential visitors, clients, customers, followers – whoever it is that you want to interact with your site’s content. There’s a lot you can do to help speed up your site and one of those things is caching.
Caching is a mechanism for temporarily storing documents, such as the HTML (generated with PHP), CSS and Javascript that your website uses, for a specified amount of time so that once a visitor has visited your website once, the subsequent times won’t take nearly as long for them to load as they’ve already downloaded and stored the data from your website on their computer in their browser cache.
Caching comes in several forms but unless you pay for a premium hosting plan you won’t be able to take advantage of all the different types. For most people using shared hosting plans, the only type of caching available to them will be page caching and it’s this that Gator Cache makes easy to set-up, use and instantly give results in the form of a faster website.
How’s it Work?
After installing and activating Gator Cache, a new, appropriately named menu item will appear in the sidebar of the WordPress admin.
In this menu, a list of tabs across the top of the screen gives access to the various sections of the plugin settings. Following these from left to right in order will allow you to get the plugin set-up in a matter of minutes. As you go through, remember to click ‘Update’ to save your changes on each tab before progressing to the next one.
On initial install, clicking on the ‘Gator Cache’ menu item will ask you to install the cache directory and copy the plugin files. For most shared hosting environments, you’ll want to click the ‘Create Cache Directory In Document Root’ checkbox and click the ‘Install’ button. A short wait later, the installation will be complete and the page will refresh, showing the plugin settings.
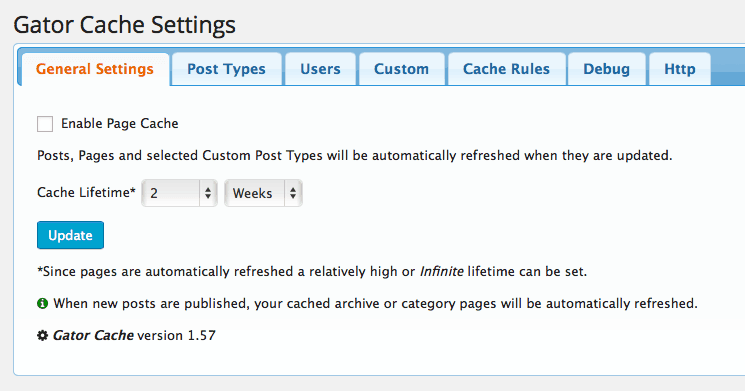
Gator Cache plugin settings
To set-up the plugin, you’ll want to enable ‘Page Caching’ by ticking the checkbox in the ‘General Settings’ tab and setting an expiry for them. A setting of 2-4 weeks is a safe starting point although options for higher or lower durations are available too. A handy note at this point mentions that when a post, page or custom post type is updated, it will clear and regenerate the cache.
A bit of background on page caching here will be useful:
When a visitor visits a page on your website, the server at the host will request that the page to be constructed and then is sent to the visitor to view in their browser. If you have a high traffic website, your server will need to generate this page lots of times from the PHP source code – once for each visitor. Imagine then, if you only had to generate the page once and that the server would store a copying in a cache that would be served instead. That server would basically do the work just once and then serve the same file to everyone which is a lot, lot less work. This is what page caching does – it stores the generated page, post or custom post type in a page cache for faster delivery to the visitor.
Clicking ‘Update’ will save these options.
Clicking through to the ‘Post Types’ tab will allow you to specify other custom post types to the cache if they’re available.
The ‘Users’ tab allows you to choose which user roles you’d like to cache the pages for. The default is set to ‘Subscribers’. The reason for this is that you may allow your visitors to login so that they can manage their account, have access to premium content, view their orders, and so on. Caching pages for these users is just as important as other visitors as they constitute a portion of your overall site traffic. Caching the site for admins, however, could prove problematic with regards to previewing posts before they’re published, amongst other things, so it’s nice to see this amount of control in a simple caching plugin and allow you to choose which user roles to enable page caching for.
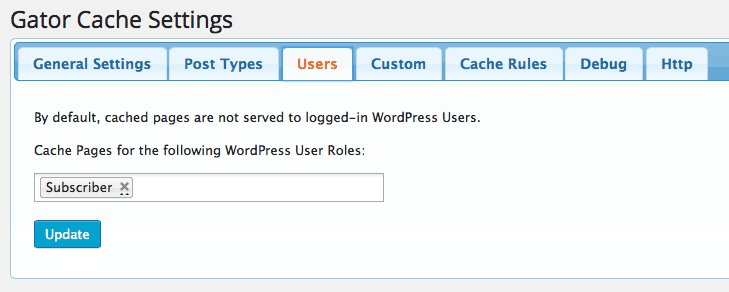
Set caching for the minimum user role
The ‘Custom’ tab allows you to specify plugins, pages, posts or anything else that should not be cached for one reason or another. In the past, I’ve had trouble caching dynamically updating plugins such as WP-Activity so I’d make sure that the ‘/wp-activity/‘ plugin directory is added here.
Moving along to the ‘Cache Rules’ tab allows you to choose when and what you’d like the plugin to cache. The default settings here are good enough for most people, however, the third ‘Refresh all pages’ option might be useful for some people who do have a dynamically updating/refreshing plugin that doesn’t update that often or doesn’t need to be excluded completely using the ‘Custom’ tab, mentioned above. If you run https on your website, ticking the ‘Cache secure SSL https protocol pages’ checkbox under ‘SSL Settings’ will enable page caching for those of you with a valid SSL certificate installed.
The ‘Debug’ tab and the associated option is probably only useful for developers wishing to diagnose problems with caching on certain pages in order to get their settings just right. For the rest of us, I’d suggest switching this off and clicking ‘Update’ to save the changes.
The last tab, ‘HTTP’, will show a list of Apache Rules to copy and paste into your .htaccess – the hidden file in the root of your WordPress installation. Using FTP, open this file in a text editor of your choice and copy and paste these rules at the very top (above the default WordPress rules), making sure to remove any other caching rules that may already be there from previously installed caching plugins. Once saved/FTPed back onto your server, this will then take care of caching other files that your site might load such as CSS, javascript or fonts and tell them not to be re-downloaded on subsequent visits. It’s the final piece of the puzzle and combined with page caching will result in a much faster website and shortened load times.
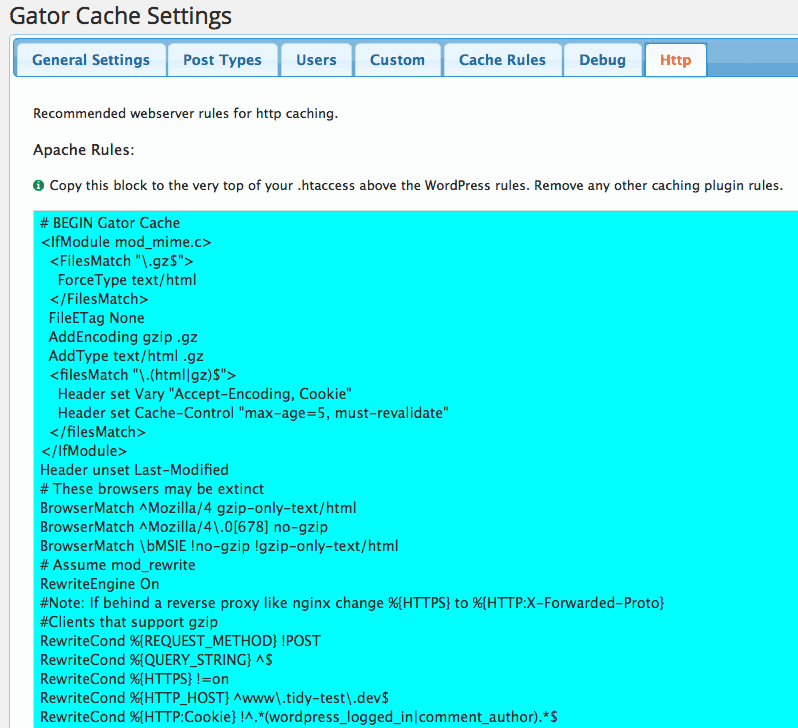
Apache Rules – The final piece of the puzzle
Costs, Caveats, Etc.
This is by far the best, most basic page caching plugin I’ve ever seen and used. I’ve previously used Lite Cache but I found this even easier to use with more clear instructions and much better support in the forums, with almost all support requests been marked as resolved. It’s hard to go wrong setting-up this plugin. It’s not a replacement for the power of something like W3 Total Cache but it is a great starting point if you have limited knowledge of caching and only have access to shared hosting.