


The WordPress admin toolbar is one of the most visible, and in my experience, least utilized tools on WordPress. Admin Toolbar Menus increases it’s utility a bit by allowing you to add any page or external links to the menu in three different locations.
What’s It Do?
Admin Toolbar Menus adds a few new menu locations to the default WordPress menu builder. Each of these is located at different places in the black admin toolbar that is at the top of every WordPress page you visit on the back-end or front. So you can easily use the WordPress menu builder to add pages, post categories, custom post types, or any external links you want to the toolbar.
The plugin also removes the WordPress logo from the admin bar, since it generally goes unused.
How’s It Work?
There are no settings for this plugin, so after you install and activate it, you can start using it by going to Appearance -> Menus. In addition to the menus that you have already set up, there will be three additional ones added by the plugin. Go to the “Manage Locations” tab to see what they are. It breaks down like this.


Three new admin toolbar locations
- Toolbar Menu (Site Name) – This is the drop-down menu that exists all the way to the left of the admin toolbar and has the little house icon. By default, this has various quick links to the front-end of your site in the admin and different parts of your dashboard when in the front-end of the site that is revealed when you hover over the menu.
- Toolbar Menu (Main) – This is a menu that adds top-level navigation to the admin toolbar. Anything added to the top of the menu will always be seen, next to other menu items like “+New”.
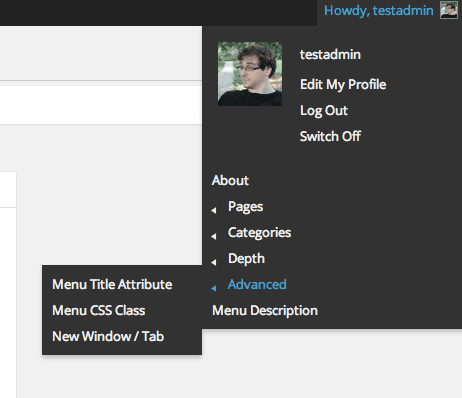
- Toolbar Menu (My Account) – This defines the drop-down all the way to the right of the admin toolbar. It typically says “Howdy, ” and has a picture of your avatar. By default, this menu shows various profile links on the drop-down, but you can add to this.
For each of these locations, you can create a new, customized menu, and add any links you want to each one. In the Manage Locations section, you can easily add an existing menu to any of these locations, but you will probably want to create a brand new one, so flip back to the “Edit Menus” tab.
From the top drop-down labeled “Select a menu to edit:” choose the admin toolbar location you want to add a menu too and click the “Select” button. Then, you can simply build the menu just as you would any other. Click on “Pages” or “Categories” to add pages or post categories. Just check the boxes next to the page or category you want to add and click the “Add to Menu” button. Similar options will be available for any custom post types on your site.

And just like that, a brand new menu
To add an external link, simply open up the “Links” box and add the URL and title in the provided text box, then add that to the menu. Each menu location also supports second and third level (and even beyond) navigation, so feel free to make certain elements child items if it fits your menu.
For more information generally about how to work with menus, you can visit the WordPress Codex.
That’s about it. Once you have saved your menu, you will see your new links added to one of the three various menu locations on both the front-end of the site and while you are browsing the admin panel. If you ever want to remove something from one of these menu locations, simply delete it from the menu screen.
Costs, Caveats, Etc.
While this plugin is still pretty new, it is fairly stable and works well. I, for one, would like to see an option to bring back the WordPress logo if you want to, maybe appended to the bottom of the Menu section for easy access. But if you are having any problems with the plugin, or would like to request something similar, visit the support forums for more information.