If you are a theme developer, there may be a base theme you are probably…
I’ve discussed VaultPress here before as a premium solution for backing up and protecting your WordPress site. But if you are hunting for a free and reliable backup and restore plugin for WordPress, UpdraftPlus is probably your best bet.
What’s It Do?
UpdraftPlus allows you to keep automated backups of your WordPress install, and then easily restore old versions. The plugin supports Dropbox, Google Drive, Amazon S3, Rackspace and other cloud storage services. Or you can use FTP/SFTP to send your back-ups anywhere. You can easily schedule back-ups to run behind the scenes and chose how many back-ups to keep at one time before it is deleted. Your database will be automatically backed up, but you can also choose to include plugin files, theme files and uploads in your backup. Each category is compressed to its own zip file which can be used later to restore to a previous version of your install.
How’s It Work?
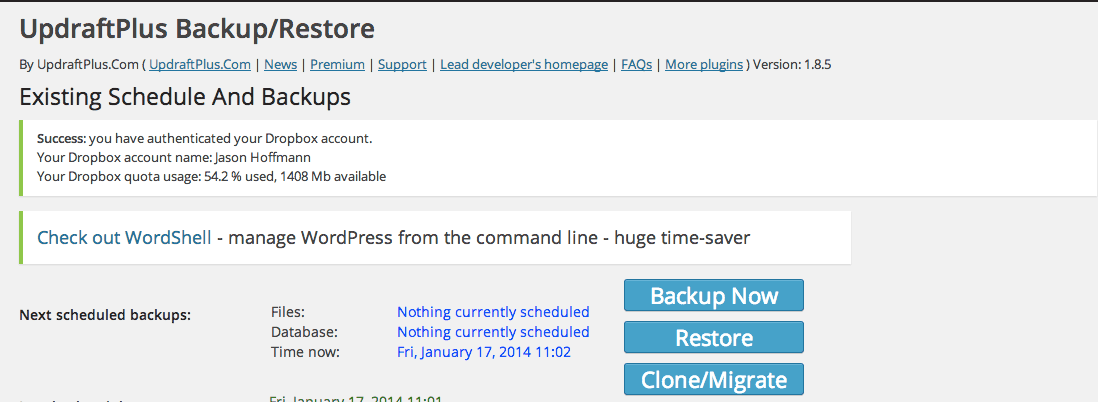
After you install and activate the plugin, you will need to configure it. Go to Settings -> UpdraftPlus Backups to get started. For now, you can ignore the top part of the options panel, which will have information about your backups, and options to manually backup or restore your site.
The first section is Configure Backup Contents And Schedule. Your backup will be divided into two parts, your database and your files (theme files, plugin files, uploads). From the first drop-down “File Backup Intervals” select the interval to perform automated backups, from “Every 4 hours” to “Monthly.” If you want to switch off automatic backups, then select the “Manual” option. Next, do the same for “Database Backup Intervals.” I recommend keeping the two at the same interval, but there may be scenarios where you want to be backing up your database more frequently than your files. Next to each drop-down there is also a “retain this many backups:” option, the default is 2. This means that only the 2 most recent back-ups will be kept. Anything older then that will be deleted. Set this to whatever you prefer.

Configure backup settings
The next option is “Files to include.” You can choose to include theme files, plugin files, and uploads in your back-ups. Simply check the boxes next to each to select them. As long as you have space, it is probably a good idea to include these.
“Database Encryption phrase” is for advanced users only, but will encrypt your database automatically. Keep in mind, this is also the phrase that will be used when you click “Restore” to decrypt the files, so make sure that it stays consistent if you chose to use it.
The Reporting section allows you to receive emails every time a back-up is performed. If you check the box, then emails will be sent to your admin’s email address.
The next section is Copying Your Backup To Remote Storage. This allows you to copy your backed up files to a remote cloud storage location. That way, if something happens with your server, your files will still be intact. From the drop-down menu, you can select which cloud storage solution to use. Dropbox, Amazon S3, Rackspace cloud, Google Drive and Dreamobjects are all included. For each, there is a different set-up, so just follow the onscreen instructions. You will usually need the username and password or any secret keys, though Dropbox or Google Drive can authenticate automatically.
After setting up remote storage
If you’d simply like to upload your back-ups to a custom location, you can also choose “FTP” or “SFTP” and enter in your server’s credentials. As a worst case scenario, you can also have files delivered by Email, though this isn’t recommended as files might be a bit large.
The last section is Advanced / Debugging Settings/ If you are having a problem with the plugin, you can enter “Debug Mode” which may help you locate it. If you click the “Show Advanced Settings” link you will see a few more settings for customizing your back-up, such as how many MB to include in each split archive file, which directory to upload back-ups to and whether or not to use SSL certificates. In general, these can be left at their default.

Progress bar when your backup is running
When you are all finished, click the “Save Changes” button to finish the configuration. If you chose automatic backups for your files or database, it should begin one automatically. Otherwise, you can select the “Backup Now” button to start your first one. This may take some time but will happen in the background, so it is okay to switch windows.
If you have a problem with your site, you can click the “Restore” button. You will be given a list of backups that Updraft has and you can select whether or not to restore the database, theme files, plugin files, uploads, or all of the above. Once you select those, click “Restore” again. This may take a few minutes depending on how large your backup is, so don’t close the browser window. After it is finished you will be notified and a log file will be available for download.
Costs, Caveats, Etc.
You may also notice the “Clone/Migrate” button on the settings page. The Migrator plugin is one of several premium extensions available for purchase. If you choose to use the free version, it will work fine, but add-ons allow some extra features, like cloning sites, storing databases in multiple locations and using with multi-site.
The plugin is updated routinely. If you are having trouble with it, the best place to go is the support forums. You can also upgrade to UpdraftPlus premium for priority support.