
A pretty simple and useful plugin, Page Template Dashboard lets see you what templates your…
If you’re embedding a presentation in your site, it’s pretty hard to make that content indexable and optimized for search engines. SEO Slides takes care of that hard work, allowing you to put presentations on your site that are search-engine friendly, HTML5 optimized and embeddable by anyone.
What’s It Do?
SEO Slides allows you to create custom presentations, one slide at a time. Each slide will be its own page with indexable content, and you can easily add custom keywords, descriptions and notes for each slide. In the end, what you get is an embeddable slideshow presentation that you can include on your own site or share anywhere else, with the added bonus of searchable content from each slide.
Slides are set-up using a custom post type and embedded using a shortcode. Slideshows are built using a master slide, which can have custom typography, colors, and backgrounds. The plugin also provides Javascript code if users want to embed your presentations on their own site. Presentations can be accessed on their own URL or can be embedded through an iframe using a shortcode button in the WYSIWYG editor.
How’s It Work?
When you install and activate SEO Slides, you will notice a new section in your WordPress admin labeled “Presentations.” Go to Presentations -> Add New to create your first one.
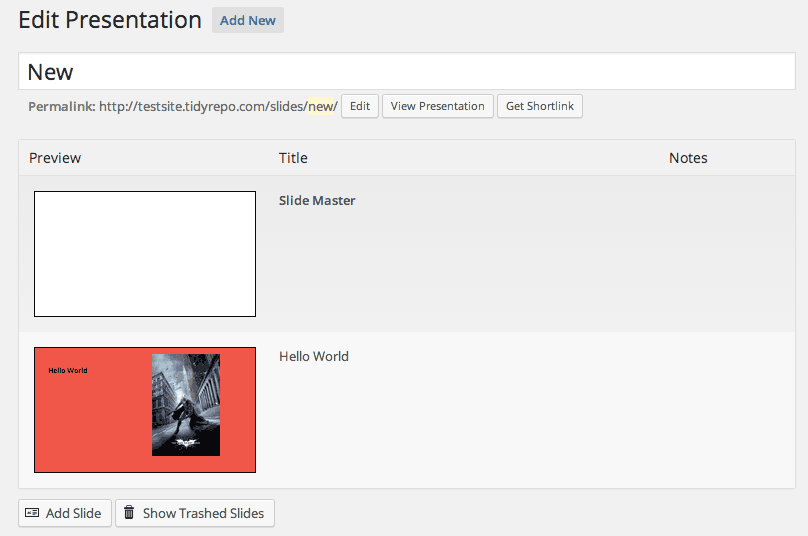
You’ll be brought to the slideshow editor. Give your presentation a title first. By default, two slides will already exist, “Slide Master” and “Hello World.” Master Slide holds the default settings for each slide. Anyone who’s built a presentation on PowerPoint or Keynote should be familiar with this, but basically, all other slides will be modeled after this. Click the “Edit” button to open up the slide editor. On the left side, you will see options for your background. Use the color selector to chose a background color, or upload or select an image from your Media Library to use as the background by clicking “Embed Image/Video.” As an added bonus, you can also choose to embed a video URL as your background from YouTube, Vimeo, etc., by selecting the “From URL” tab and then selecting the “Video” button. At the top of the page, you will see a few slide templates, which will Auto-populate the page with filler content in different layouts to get you started. Remember though, this is your Master Slide so don’t include content unless you want it to be visible on every slide in your presentation. When you are finished, select the “Save Slide Master” button.
Arranging and editing each slide
Now you can start adding slides to your presentation. I find it best to just delete the Hello World slide and start from scratch by clicking the “Trash” link, but you can keep it if it suits you. Otherwise, click the “Add Slide” button to add your first slide. Once again, you can select different background options on the left side. In the main slide area, chose a template from the top that you would like (image next to the text, header plus text, etc.) and click on any content area to edit it. You will notice that when a content area is selected you can resize it, or use the black bar on the left side to drag it around, anywhere you wish. Add any content that you want, and format it using the floating WYSIWYG editor where you can choose fonts, colors and heading styles. If you want to include an image, chose a template from the top which contains one.
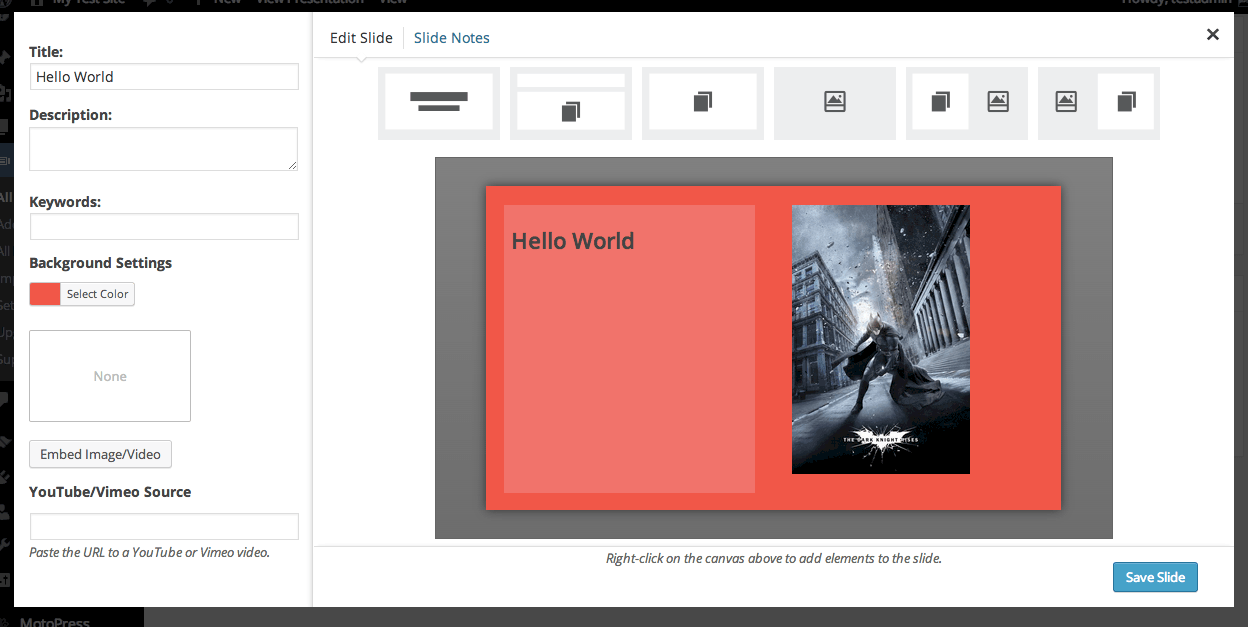
Editing the slide using the WYSIWYG slide editor
On the left side, you’ll see a few more text areas as well. The first is “Keywords” and the second is “Description.” The advantage of SEO Slides is that each slide is it’s own HTML page, with its own keywords and meta description. That means you can optimize each slide individually, adding relevant tags and descriptions for each one, instead of simply for the presentation as a whole. This will be very useful for those looking to have their content properly indexed. Go ahead and fill in these sections just as you would any individual post.
Another way to add content to each slide, without having to overload it with content, is to add slide notes. At the top, click the “Slide Notes” tab and you’ll be directed to a basic WYSIWYG editor. Here you can add any notes related to each slide. This content will be hidden from a users initial view, but they will be able to access it through a tooltip button. This is also content that will be indexed.
Repeat the above steps for each slide that you want to create in your presentation. You can rearrange the order of your slides by simply dragging and dropping them in the slide editor.
On the right sidebar, you will see a text box labeled “Embed Backlink.” This is optional, but if a user decides to embed your presentation on their site, this link will be included along with it. It’s a good space for you to put your main site or blog’s URL.
When you are all finished, click the “Publish” button. Don’t worry, you can update the slideshow at any time. When you publish your slideshow, it will be available at its own URL, which you can see at the top of the page. Click the “View Presentation” button to see it in action. The presentation pages will be full-screen HTML pages, with all of the content indexable and styled.
However, if you want to include the slideshow on individual posts and pages you can make use of the included shortcode. To do so, visit the page you want to embed the slideshow on and click the new SEO Slides button in your Visual Editor. From there, you can select which presentation you want to include by selecting “embed an existing presentation” and choose yours from the drop-down. Click the Embed Slideshow and the shortcode will be automatically generated with syntax that looks like this.
[seoslides embed_id="e34b334d7d59" script_src="http://yoursite.com/embed-script/hello-world/hello-world/" overview_src="http://yoursite.com/slides/hello-world/" site_src="http://yoursite.com" site_title="My Test Site" title="Hello World!" /]
Feel free to edit the “site_title” and “title” attributes. This will be shown underneath the embedded slideshow with a link to the presentation main page.
Embedded slideshows will be added to pages in an iFrame, so that multiple versions of the same content are not duplicated, and for performance reasons. Users will be able to click a link in the bottom right corner, that flips the presentation over and shows Slide Notes and an embed code. The embed code comes in Javascript and WordPress shortcode varieties, for users with different needs.
A listing of all slides
And that’s about it, you’ll have an SEO-optimized presentation embedded on your site.
Costs, Caveats, Etc.
SEO Slides features a pretty smart structure and is still in the process of being developed. It is free, but there is also a premium license, which allows you to upload PDFs that can be converted to slides, free art, priority support and a bit more.
For now, if you are looking for help with the plugin, visit the support forums.