If you're a WordPress developer, chances are from time to time; you just want a…
If you’re looking to set up an intranet, staging site, or an otherwise semi-restricted site, the Restricted Site Access plugin makes it easy to choose which IP addresses can access your site, and block everyone else.
What’s It Do?
Restricted Site Access adds settings to your WordPress install which blocks all visitors unless they are coming from specified IP addresses. You can enter in a single IP address, or a range of IP addresses, then chose where to redirect restricted users, either the login page, web address a custom page, or with a simple message. Any user that is logged in to your site as admin will not be affected by this and will be able to access the site from any IP address.
How’s It Work?
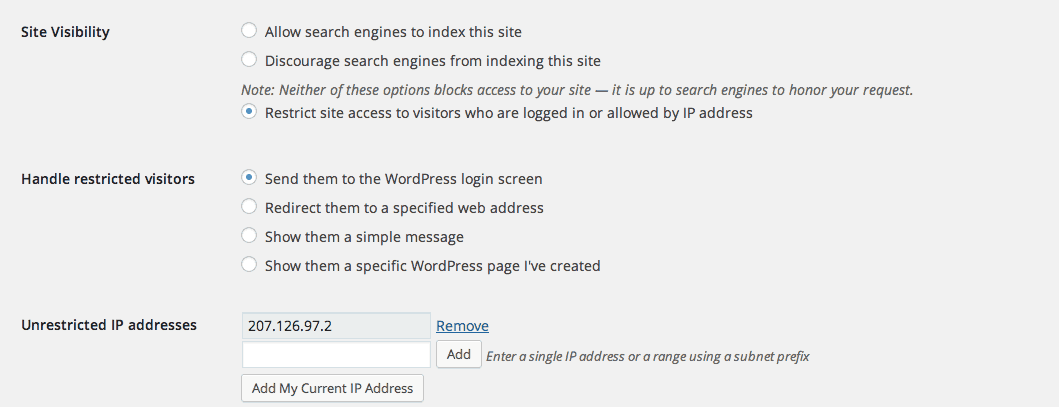
Once you install and activate the plugin, all IP addresses will be blocked, so make sure that you are logged in. Go to Settings -> Reading then scroll down to the bottom to see the plugin’s settings.
First, you’ll want to select where you want to send blocked users. You can choose to send users to the login screen, redirect them to a different web address altogether, show them a message, or send them to any page on your WordPress site, and only that page. If you choose “Show them a simple message” a text area will pop up where you can type in your custom message. This page will just have text in a white box on a gray background. If you choose “Show them a specific WordPress page I’ve created” select the page that you want to send them too from the provided drop-down.

Settings added to the bottom of Reading Options.
The next thing you’ll want to do is enter in IP addresses that you want to allow in. If you want to include your current IP address, click on the “Add My Current IP Address” button and it will be added to the list. Otherwise, enter the IP addresses you want to allow in the provided text box, then click “Add.” If you want to add a range of addresses, you can do that do:
10.0.1/35
Once you have added all of the IP addresses you want to allow make sure to hit “Save Changes.”
If you want to turn off restricted access, you can do so by changing the “Site Visibility” option to anything other then “Restrict site access to visitors who are logged in or allowed by IP address” which will be enabled by default when the plugin is activated.
You can also unrestrict certain parts of your site, such as the RSS feed, using a simple filter. Open up functions.php and add:
dd_filter( 'restricted_site_access_is_restricted', 'my_rsa_feed_override' );

function my_rsa_feed_override( $is_restricted ) {
    global $wp;
    // check query variables to see if this is the feed
    if ( ! empty( $wp->query_vars['feed'] ) )
        $is_restricted = false;

    return $is_restricted;
}
If you want to unrestrict anything other then the feed, simply replace the “feed” variable with any query variable WordPress provides.
Costs, Caveats, Etc.
Restricted Site Access is free and updated often. Just remember, with any plugin of this kind, nothing is bulletproof. Any publicly accessible files may go unblocked and hackers can fudge IP addresses. If you are worried about security, just combine this with a good security plugin for extra protection.
If you are having any problems with the plugin, visit the support forums.


