Gists is a handy tool started by GitHub which allows you to share chunks of…
Over the years, I’ve found myself in the functions.php file, creating custom shortcodes or snippets of code. Maybe I just need it for one thing and I don’t want all of the add-ons that come with a full-featured plugin. That’s where Post Snippets helps to fill the gap. It lets you create small samples of HTML and PHP with built-in variables, and lets you transform this into a shortcode, should you see the need.
What’s It Do?
Basically, Post Snippets stores little pockets of code that you can use anywhere on your site. For each snippet, you assign a couple of variables, then define the code you want around that variable. You can then easily call up that snippet using a button in your TinyMCE editor, and all you have to do is fill in the values of each variable. Post Snippets supports HTML and PHP.
The plugin can also be used to create custom shortcodes; variables are simply changed to be shortcode parameters.
How’s It Work?
When you install and activate Post Snippets, there will be a new menu under Settings -> Post Snippets. When you click on this you will be brought to a screen with a few buttons. To get started with your first snippet of code, click on “Add New Snippet.”
This will create a new snippet sample with a few text fields and checkboxes. You’ll see three text boxes at the top, Title, Variables, and Snippet. In the title field enter what you want to call your code snippet. This is how it will be identified throughout the site, so choose something meaningful. The next box is Variables, I’ll come back to that in a moment. In the Snippet box, you’ll want to enter in the actual HTML or PHP you want to use.
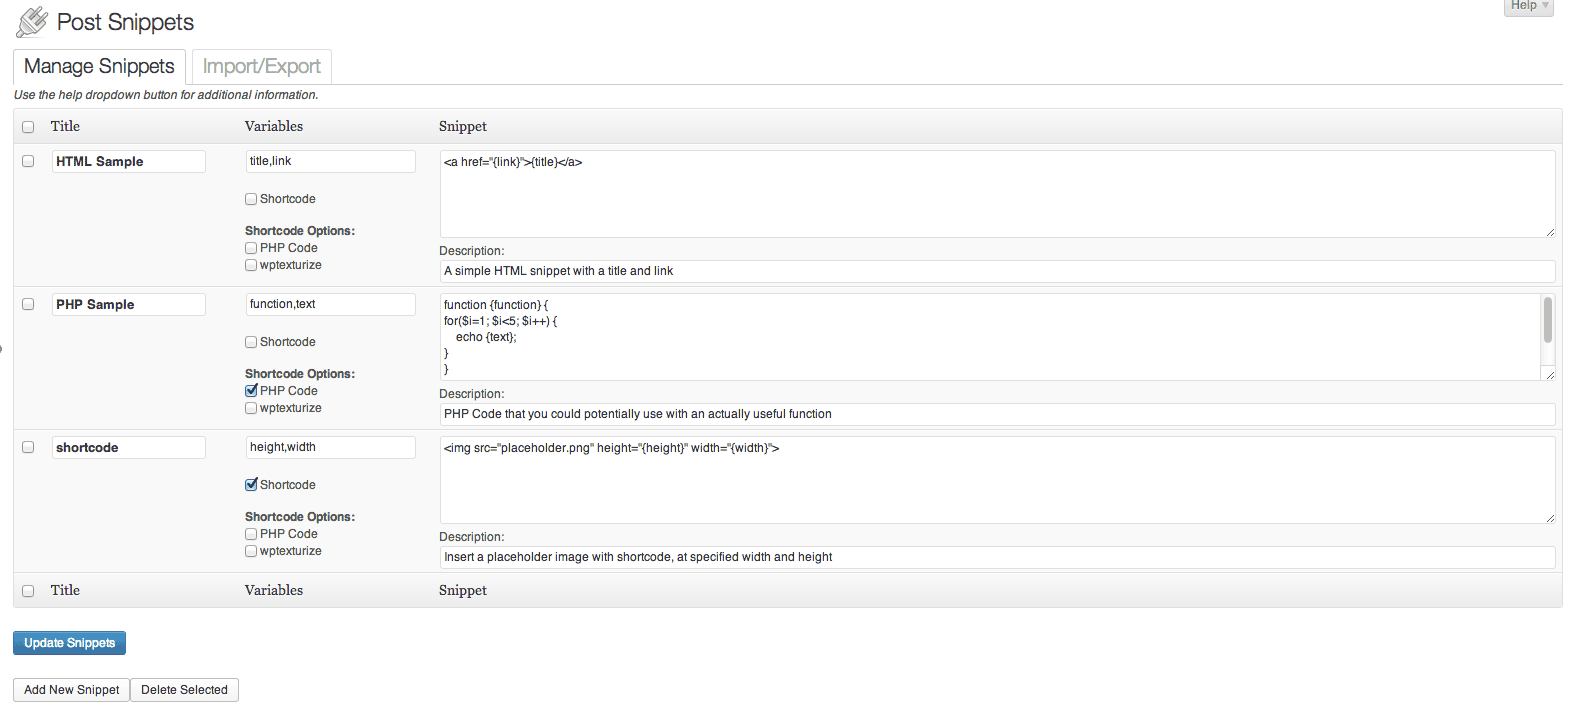
The Post Snippets Edit Screen
Let’s start with a simple example, let’s say you want to enter a link with a title. In the Snippet box, enter:
<a href="{url}">{title}</a>
You’ll probably notice that {url} and {title} is not standard HTML. This is where variables come into play. In the variables box, I’ll put in these two parameters to match the snippet, separated by a comma: URL, title. When I use this snippet on my WordPress site, I’ll be asked to give a value for URL, and a value for the title. The plugin will automatically fill in the bracket areas with each value and output it into your post editor. Basically, create variables for parts of the snippet that will vary each time (that should make sense I suppose) and indicate them in your snippet section with brackets.
If you’d like to use PHP code, make sure to select the “PHP Code” checkbox, then simply use the plugin in the same way. In this example, our variable would be “echo_text.”
echo "{echo_text}";
Setting up a shortcode is done the same way, you just need to check off the “Shortcode” box, underneath the variable field. This will transform your variables into shortcode parameters that can be specified in a post, rather than automatically inserting the code snippet. Let’s say, for instance, I want a shortcode that inserts a placeholder image with a specified width and height. I’d insert “width, height” into the variables section, and then put this in the snippet box:
<img src="placeholder.jpg" width="{width} height="{height}">
Now, if I want to use the actual shortcode, I would just use [[shortcode width=”500″ height=”500″]] just like I would any other.
The only other option is to use wptexturize. If this box is selected then certain special characters, such as smart quotes, em-dashes, trademark symbols, and a couple of others, will be automatically converted to their corresponding symbol. You can read more about this in the WordPress Codex.
To use a code snippet, go to the post editor of any post or page. You will see a new button in your TinyMCE editor. ![]()
A new button will be added to TinyMCE
When you click on that button, it will open a box with a list of your code snippets up at the top. For each snippet, the variables that you defined will be represented as text fields. Simply fill in each field with the values you want for each value, then select “Insert.” If you are using a regular post snippet, then the HTML or PHP will be inserted right into your post. If you chose to use a shortcode, then the shortcode will be entered with the parameters filled out. If you did chose to use the shortcode option, then you can also insert this like you would any other shortcode, by inserting the shortcode title and parameters inside your WYSIWYG editor without using the button.
You can also use the built-in method PostSnippets::getSnippet($name, $variables) to call a code snippet in your template files. Use the title of your snippet for the $name parameter and fill in the variables in an array for the $variables parameter.
$mySnippet = PostSnippets::getSnippet('placeholder', array('width'=&gt;500, 'height'=&gt;500);
echo $mySnippet;
When creating snippets, make sure you keep your variables in mind and only use a variable when you know that a piece of code will change. For simple examples, this may be obvious, but it can get redundant with more complex examples.
Costs, Caveats, Etc.
Post Snippets is completely free and well maintained. Johan is fairly active on the support forums, so that’s the best place to go if you have a problem. The project is also open-sourced on GitHub, so head on over if you have a code issue or would like to contribute.