If you haven't realized it yet, I'm a big fan of lightweight plugins. And if…
The title of NextGEN Facebook is actually pretty misleading, as it only has to do with NextGEN gallery in a cursory way. What the plugin really does is allows you to add appropriate meta tags to your posts and pages for proper integration with Facebook, Twitter, Pinterest, and Google+.
What’s It Do?
There is a lot of code that needs to be added to the section of your webpage in order for social media channels like Facebook, Twitter, Pinterest and Google to properly read the data of your page and show meaningful content to users who share it. For instance, if you want to add a little thumbnail image to a Facebook page, you would normally have to go and insert this little bit of code.
<meta property="og:image" content="http://full/path/to/image.jpg">
And that’s just for an image. Similar properties have to be added for titles, descriptions, URLs, etc. This is called Open Graph data and it is used by external services to appropriately display content from your page. But this metadata can vary from channel to channel. The NextGEN Facebook plugin automatically adds this metadata to the top of all of your posts and pages so you don’t have to. That means when a user goes to share your page on networks, thumbnail images will be pulled in, custom descriptions will be added, proper titles will be used, and more without you having to touch anything. In general, the plugin takes the proper approach, asking you to answer some information about your site, then filling in data appropriately. There are also a couple of nifty secondary features, such as the ability to add (fairly lightweight) social sharing buttons to post, pages, and the WordPress post editor. You can also add authorship to your pages for a number of networks, notably Google+ (if you’re wondering, that’s how you get your face in the thumbnail of search results).
How’s It Work?
To get started with the plugin after you install and activate it, go to the newly created NGFB -> General. The top section, “Open Graph” Settings will ask you to answer some basic information about your site. First, pick a general topic area from the drop-down menu that reflects the content on your site. Then, type in your “Site Name” and “Site Description.” By default, these will be pulled from your general settings, but feel free to change it to whatever you want. You can choose a “Title Separator,” a character that separates the site title and the post title in the metadata title field. You can also choose a description and title length, though you should probably leave these at their default. “Add Page Title” and “Add Page Ancestor” allows you to add some more information to tags metadata. This really only works if you want to include extensive subject information with your content. In general, leave these unchecked. You can also select how many tags to include in your open graph data, whether or not to include the excerpt of your post with the “Content Begins at First Paragraph.” Keep in mind, there is a very helpful question mark icon you can hover over to get more information about any section.
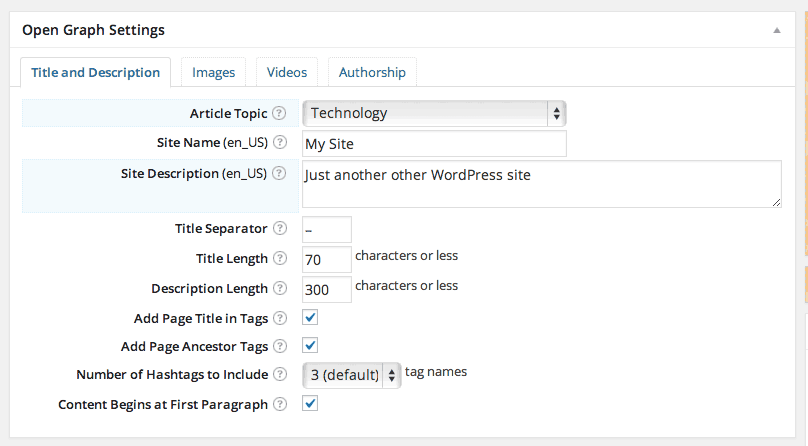
The first step is to feed the plugin with info about your site
The “Images” tab allows you to control metadata associated with images. By default, the plugin will automatically add featured images as an image associated with a post. However, if your post does not have a featured image, you can choose the default image to use, either by entering in its ID From the Media Library or the absolute URL if it is hosted elsewhere. You can also specify the dimensions of the image (try to keep it square). Check the box next to “Use Default Image on Indexes” if you want to use the selected default image on your homepage, category pages, and other index pages, and check the box below to include it on search result pages. If your posts typically include more then one image, you can also choose to show a few of them from the drop-down. Remember, this is the image that users will see when your posts and pages are shared on Facebook, Pinterest, and Google+.
The “Video” tab is similar, allowing you to select an absolute path for a default Video. You can probably leave this section alone unless you have a video heavy site, and generally leave things at their default, so videos are only included if the post includes one.
The last tab “Authorship” allows you to set defaults for author metadata attached to your post. From the “Author Profile URL” drop-down menu, select the service you want to utilize. The most common is probably Google and Facebook. This author will be taken from the author of your post, but you can also choose a default author if a post author is missing, and choose whether to include authorship on index pages (recommended) and search result pages (not as recommended). Finally, enter in the “Article Publisher Page URL.” This is the URL of the profile associated with the service you selected, like your Google+ or Facebook profile page for the default user.
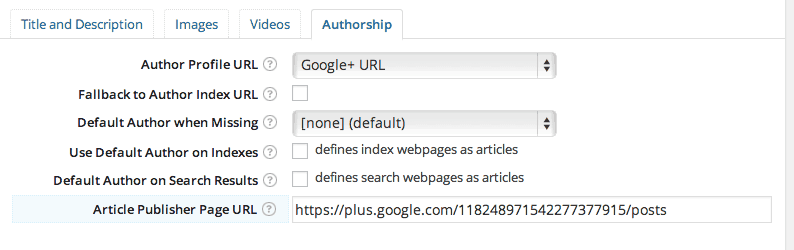
Authorship is a handy feature which will show your picture in search results
Note, after this plugin is installed, there will be a Facebook, Google+ and Twitter text fields on all users profile pages. Make sure to tell your authors to include these links in their profiles, or else authorship will not work properly.
Below Open Graph Settings is the “Publisher Settings” section. This has specific options for each social channel. For Facebook, you can add the URL to your admin account, and API key if you have one set up. This will allow you to access Analytics data. The Google section has a few more options related to authorship, so just make sure you copy and paste your Google+ profile in the “Publisher Link URL” field to set that up properly. And the Pinterest section has a simple drop-down for “Author Name Format,” which allows you to specify which author name should be used for Pinterest authorship (Display Name, First and Last Name, or Nickname).
When you’ve set everything up, click “Save Changes.”
The NGFB -> Advanced section has a lot of fine-tuned features available to pro users of the plugin. However, I will only be covering the free version here, though I encourage you to check out the Pro version if you find the plugin useful.
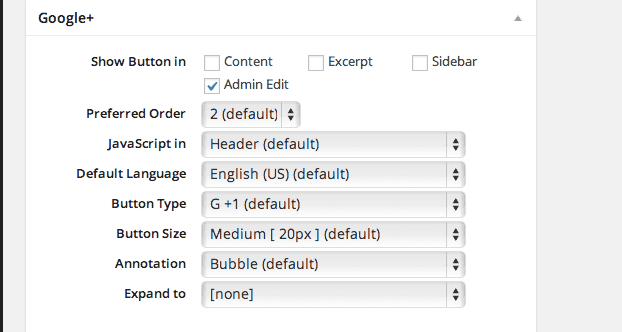
Basic social button settings
the NGFB -> Buttons section allows you to add social sharing buttons to different places on your site. I won’t go into too much detail about how to get this set up, as it is fairly self-explanatory. However, for each social network, including Facebook, Google+, Twitter, LinkedIn, Pinterest, Buffer, ManageWP, Reddit, StumbleUpon, and Tumblr. For each, you can choose where to actually show these buttons. By default they will be shown in the “Admin Edit” section, meaning in the top right corner of your WordPress post editor. This is so authors can tweet their post out their followers right from the admin panel. You can also include buttons in the Content, or main section of individual posts, the Excerpt section, and the Sidebar. Content is probably your safest bet. For each, you can also choose whether or not to include a counter, and maybe customize the style of the button a little. Finally, you can choose where to include your Javascript, in the header and footer. Remember, for each social button that you add, there is a performance cost of injected Javascript that controls the data and styles of the buttons. If you are searching for a lightweight alternative, try the Social Sharing plugin.
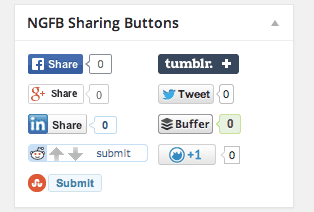
Sharing buttons in the post editor
Finally, you can validate and check your metadata by scrolling to the “NGFB Custom Settings” section in the post editor and turning to the “Validation Tools” and “Header Tags Preview” tab. These give you access to a few automated tests and will give you a preview of what your metadata looks like for that post. Other then that, the plugin will start adding Open Graph data to your posts immediately, which you can see if you View Source on any page on your site.
Costs, Caveats, Etc.
The light version for NextGEN Facebook is entirely free, though there is a Pro Version that is advertised quite a bit when you install the plugin. This can be a little annoying but is not necessarily that prohibitive. The Pro Version gives you access to a ton of new features, like Twitter Cards, specifying metadata on a post by post basis, URL Shortening, integration with other plugins, and a whole lot more. If you like the free version, I’d recommend checking it out, though I don’t have personal experience with it.
The plugin is also well maintained and keeps everything on your site very quickly, so you don’t have to worry about much of a performance hit. The plugin developer is very active in the support forum, but there is also a full setup guide and FAQ if you are running into some trouble.