If you're using the WordPress featured images feature, there might be a couple of reasons…
Meteor Slides is a dirt simple slideshow plugin that keeps your WordPress site lightweight and functional. It’s not as robust as some other options out there, but for simple slideshow set-ups, it does the trick.
What’s It Do?
Meteor Slides takes advantage of the jQuery cycle plugin to create customizable slideshows that can be embedded into posts and pages or with template tags. Slideshows created by the plugin are completely responsive (and that means mobile friendly), and there are several different transitions to choose from, such as fade, slide, grow, etc. The plugin supports multiple slideshows and metadata options for even more control.
There are probably some of you out there looking for a one size fits all slideshow plugin that does everything under the sun with no negative consequences. These are hard to find, and they certainly aren’t for free. Meteor Slides is for people looking to get an elegant slideshow or two off the ground and integrated into their site quickly, without a major performance hit. You won’t be buried under a mountain of options, the plugin keeps everything simple.
How’s It Work?
Upon activation, Meteor Slides sets up a new custom post type labeled Slides. You’ll see a few new options to add new slides and organize them into slideshows. The first place to start, though, is in Slides -> Settings.
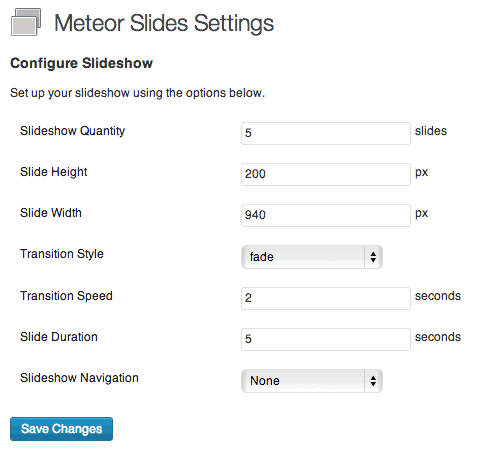
Meteor Slides Settings Page
On the plugin settings page, you will see some options to configure your slideshow. These options are global for all slideshows, but keep in mind you can also change individual slideshows later using metadata. The first is the Slideshow Quantity, the number of slides per slideshow. The default is 5, but change to whatever you’d like. The next two options are for Width and Height. Meteor Slides is actually responsive, so think of these more as a max width and height, which will scale down as screen size becomes smaller.
The next two options deal with transitions. You can choose a Transition Style from the drop-down menu, or what effect you want to use between slides. There are over 25 to chose from, but you can choose to fade, zoom, grow, blind or whatever you would like. To see a full list of available transitions, you can check out the jQuery Cycle effects browser. You can also define Transition Speed in a text field below the style drop-down.
Lastly, you can select Slide Duration, or how long each slide should appear for and select from a few different Slideshow Navigation types. The “Previous/Next” option will insert arrows activated on hover on the left and right side of the plugin so users can flip through slides. The “Pagination” option adds small circles underneath the slideshow which indicate how many slides there are, and which slide the user is currently on.
When you are all finished, select Save Changes.
Now it’s time to add your first slideshow. In the admin panel, select Slides -> Slideshows. You’ll be brought to a screen displaying a list of your slideshows, similar to WordPress’ built-in taxonomy screen. On the left is an option to Add New Slideshow. Fill in a Name, a Slug (typically lowercase and one word, used for URLs) and a description for your slideshow. The description is typically not used unless you would like it to be, but it’s good to fill it out anyway. There is also an option to add a parent slideshow from one that exists, though I can’t think of a good use case for this. Once you are finished, just click Add New Slideshow.
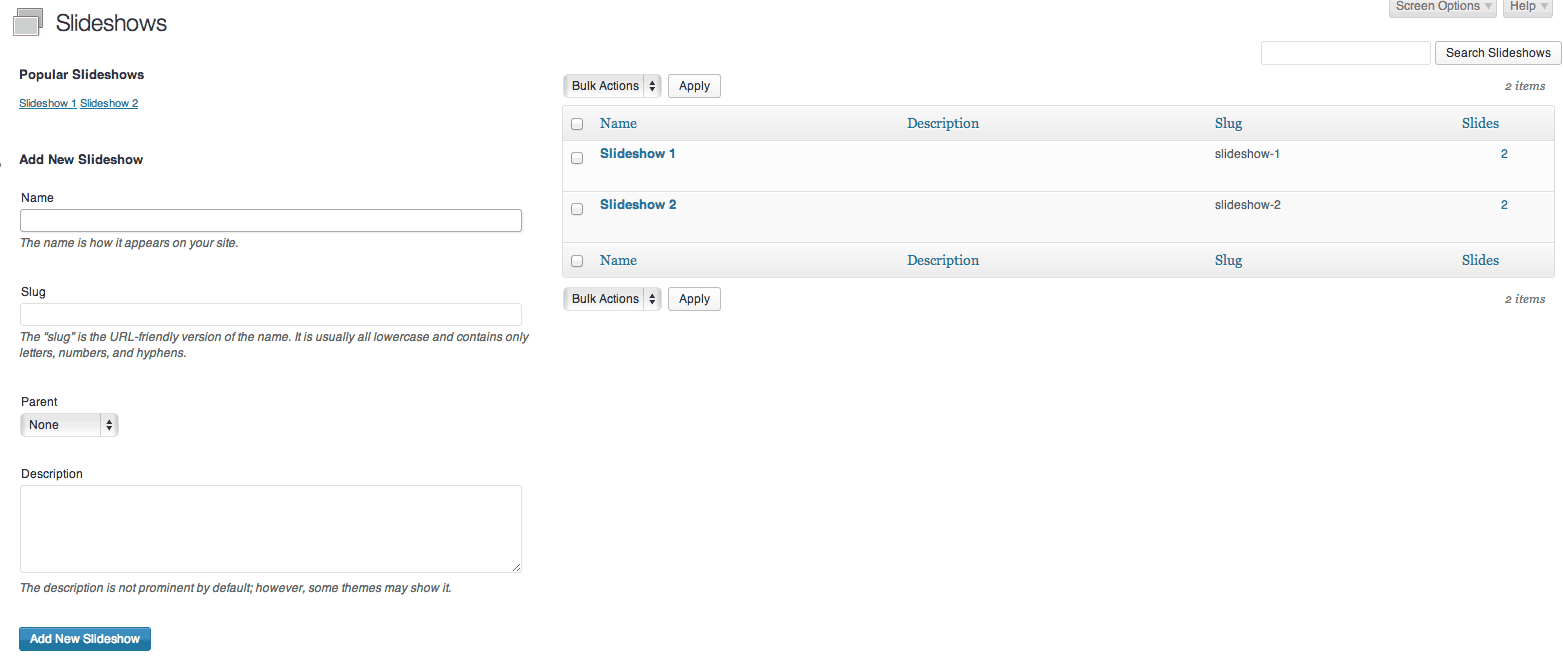
Adding a New Slideshow
You can create as many slideshows as you would like, but all you need is one to start with. Individual slides are created independent of slideshows and can be assigned to any, more than one, or no slideshows. This allows you the flexibility of switching slides around.
From the sidebar select Slides -> Add New. This will take you to a slide editor screen with a Title field, a Slide Image uploader and Slide Link field. Enter a title for your slide, then click the Set Featured Image link to add the actual slide image. You will see the standard WordPress media uploader, so you can either select an image from your Media Library or upload a new one. A word to the wise: Make sure that you upload an image with the proper dimensions, or at least the same aspect ratio, as you defined in your settings. If you have a bunch of images with different sizes/aspect ratio in the same slideshow, then there may be some extra space added to the bottom. Not the most annoying thing in the world, but easy enough to avoid. If you’d like the slide to link out somewhere, just enter this into the Slide Link field, though this is optional.
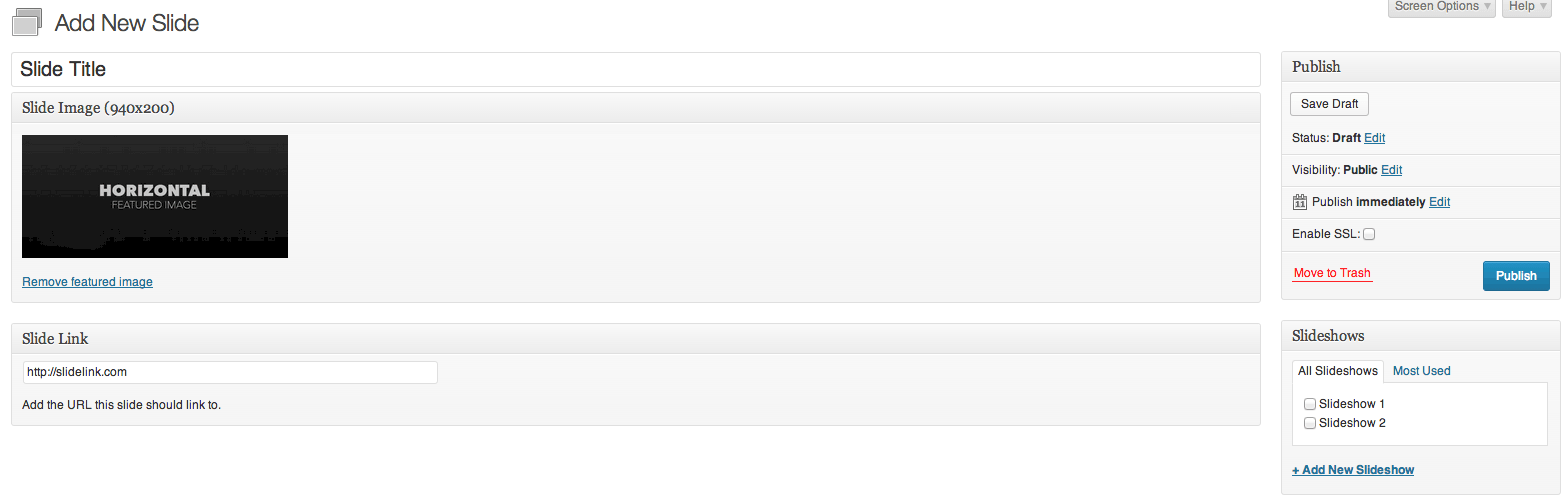
The Add New Slide screen
When you are finished with your slide, select the slideshow you created from the Slideshows meta box on the right to insert it. Then just click Publish. Then, just add new slides until you have a complete slideshow. Slides are automatically ordered according to publish date, the newest post is first in the order, while the oldest post is last. The only way to change the order of slides to adjust the publish date of each one.
There are a few ways to add a slideshow to WordPress. The first is to simply use the shortcode. Just enter the name of your slideshow to insert it into a post or page:
[[meteor_slideshow=”SlideshowName”]]
You can also use a PHP function to insert it straight into your templates. Again, the syntax is very simple.
<?php if ( function_exists( 'meteor_slideshow' ) ) { meteor_slideshow("SlideshowName"); } ?>
The last way to add a slideshow to your theme is by using the widget in Appearance -> Widgets. Drag the widget to the proper sidebar, add a title (optional), select which slideshow you would like to show, and click Save.

Adding Slideshows To Your Theme
In all three cases, you can simply leave off the name entirely and the plugin will simply display every slide, regardless of slideshow category, up to the amount specified in your settings. You also have the option to add metadata to each option, to further customize the slideshow once it is implemented. This can be used to change any of the options on the settings page, to use any options provided by the jQuery cycle plugin, or to change the alignment of the slideshow. So let’s say you wanted to add a new width and height to your slideshow, with a zoom transition, aligned center, and slides in random order. you would add the shortcode:
[[meteor_slideshow=”SlideshowName” metadata=”align: ‘center’, fx: ‘zoom’, random: 1, height: 150, width: 300″]]
Or in PHP form
<?php if ( function_exists( 'meteor_slideshow' ) ) { meteor_slideshow("SlideshowName", "align: 'center', fx: 'zoom', random: 1, height: 150, width: 300"); } ?>
There is plenty more information from the plugin author on using metadata, so I would recommend that you check that out.
The only thing that I would add is that if you happen to change the size of your slideshow at any time, make sure to re-upload your images in your slides. The plugin automatically resizes images based on your parameters, so re-uploading images will prevent squashing and stretching.
Costs, Caveats, Etc.
Meteor Slides is free to use, though not as robust as some premium options. If you are looking for something simple, it’s definitely the way to go. It hasn’t been updated since the beginning of the year, but I’ll be keeping my eye on that. As far as support, Josh is fairly active in the support forums, so that’s a good place to go for help. You should also check out Josh’s blog for documentation and examples.