If you find yourself switching between post statuses (draft, published, scheduled, etc.) often, you may…
Some people like to use their blog to stream their personalized media from various social media accounts. It puts everything in one place and lets you own your own data. An essential piece of this your Instagram account. Instagrate makes this possible.
What’s It Do?
Instagrate pulls in a stream of your Instagram photos and allows you to distribute them on your blog however you want. You can set-up each image as a separate post automatically, import the photos to your media library, or be ultra-selective and post images or posts manually.
Instagrate features support for multiple Instagram accounts, video, galleries, comments, hashtag filters and a lot more. It’s set-up to work with a Cron job as well if you want to post new images on Instagram automatically. You can also customize the output of your Instagram photos with a precise level of customization, such as including captions, tags, comments, profile URLs and more.
How’s It Work?
Instagrate decouples your photos from the rest of your install so they can be easily updated and posted. The first thing to do is activate the plugin and enter your license key. You’ll be directed to the Settings page, which can also be found at Instagrate Pro -> Settings.
If you click on the “Global Settings” tab. Here you will find options that relate to the overall functionality of the plugin. You can do things like set a default title, in case the photo doesn’t have one, limit the characters of the title length, change the title and caption of photos saved to your media library, add a custom rel attribute for integration with lightbox or other plugins, and hide meta boxes on your admin page.
The “Comments and Likes” tab has a few settings that are unique to Instagram comments. You can pull these into your WordPress install and sync them alongside regular WordPress comments. To enable this feature, click the box next to “Enables Instagram comments imported as WordPress comments.” Keep in mind that these comments will only be added if you chose to create separate posts for each image, which we will get to later. You can also choose whether or not to include Instagram avatars in the comments, and automatically approve comments as they come in.
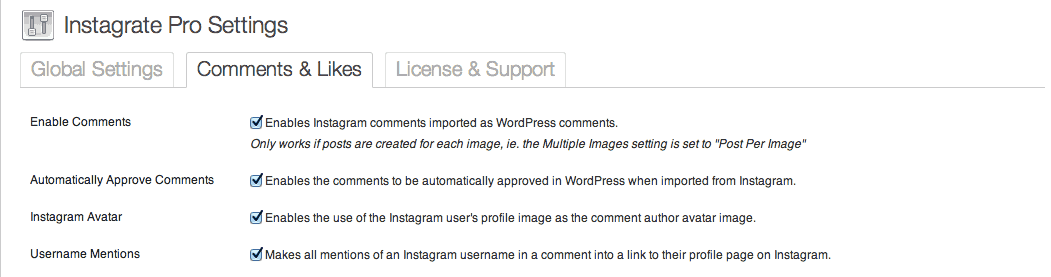
Instagrate comment settings
For a full list of settings and what they mean, you can go to the plugin’s documentation.
Now it’s time to actually bring your Instagram photos in. Go to Instagrate Pro -> Add Account. You’ll see a page that looks like the post editor. It is here that you can customize the actual output of the plugin. But first, make sure to click “Save Draft.” That will reveal a button on the left side that says “Login to Instagram.” Click on this, enter your login credentials for Instagram, and you’ll be redirected back to the editor. But hold on, don’t hit Publish just yet.
The first box to check out is in the sidebar, labeled “Instagram Settings.” The “Media Stream” menu is what you actually want to pull into WordPress. By default, it will pull in “My Recent Media” which is your own personal Instagram photos. However, you can also pull in “My Feed” which is all of the photos in your news feed, “Users Media,” which allows you to specify a username to pull from, “All Hashtagged Media” which filters out a certain hashtag, or “Location Media” which lets you only pull in photos from a certain location. Beneath this is a “Hashtag Filters” text box. If you enter in a hashtag here, then only photos with that specific hashtag will be pulled in. Lastly, under “Media Filter” you can choose to pull in Only Images, Only Videos, or both.
Skip the Publish box for now and go to “Posting Settings.” The first drop-down menu designates how often Photos should be posted to your site. “Constant” means that posts will be added whenever somebody visits your site. It just uses this to fire the event, so that it can pull in photos almost as soon as they are uploaded to Instagram. “Scheduled” lets you set up a scheduled time for new posts to be added. This can be daily, hourly, weekly, every fortnight, or more. Just select the how frequent you want to add new images, and a time of day to add them. “Cron Job” is next if you want to set-up a custom cron job, which I won’t cover here. Lastly is “Manual,” which means that new posts won’t be added until you click “Update” on the account page.
Next up is what “Post Type” Instagram photos should fall under, either Posts, Pages or any custom post types you have. Below this is probably the most important part, “Multiple Media.” This section basically defines how exactly Instagram photos are displayed on your site, and there are a few options.
- Post Per Media – This means that each new Instagram photo will be published as a new post on your site. We will get to the actual content of this post later, but know that each new photo will be its own post or page, and will be published just like any other post on your site.
- Media Grouped – This will take a group of photos and post them in the same post. The amount of photos is defined by how many photos have been added since the last update (which means “Constant” probably isn’t a good idea here). The title of the post will be pulled from the “Default Title” in settings. You can set the order and add a Location Map with this option.
- Same Post – This allows you to attach all of your Instagram photos to an existing post. You can select that post from a drop-down menu and chose whether to include the images at the top or bottom of the post.
The editor screen for Instagram posts
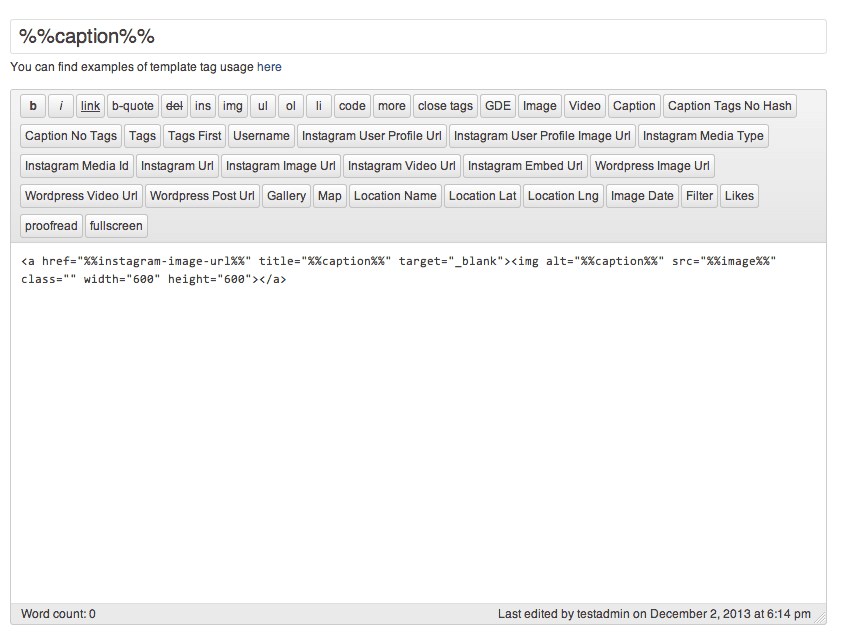
Of course, now we need to customize the actual output of your post. This is only relevant if you have chosen the “Post Per Media” option. Otherwise, images will be output in grid form either in a new post (Media Grouped) or attached it to a new post (Same Post). But if you did decide to create new posts with each new image, then you can use the editor to the left to customize what data is included. You will see the default settings, so use this as a guide. Instagrate uses a “%%” shortcode in order to define different kinds of metadata. For instance %%caption%% will output the text of the photo’s caption. %%instagram-url%% will output the source URL of the image, etc. There are about 25 or so to chose from, and you can arrange them however you like. For instance:
<a href="%%instagram-image-url%%" title="%%caption%%" target="_blank"><img alt="%%caption%%" src="%%image%%" class="" width="600" height="600"></a>
This is the default. It puts a picture of the image with a link to the raw file. Pretty simple.
The last step is to specify taxonomy options in “Post Settings.” The first checkbox is whether or not you want to save Instagram Media to your Media Library. This is useful if you want to be able to pull Instagram photos elsewhere on your site. Below this, you can choose to include photos in any category or custom taxonomy on your site. You can also choose who the default post author is, and what post format to use (“Image” for instance), if you are making use of custom post formats. Lastly, you can define the “Status” of the post. By default, this is Published, but you can also set it to Draft or Pending Review to organize them before actually posting.
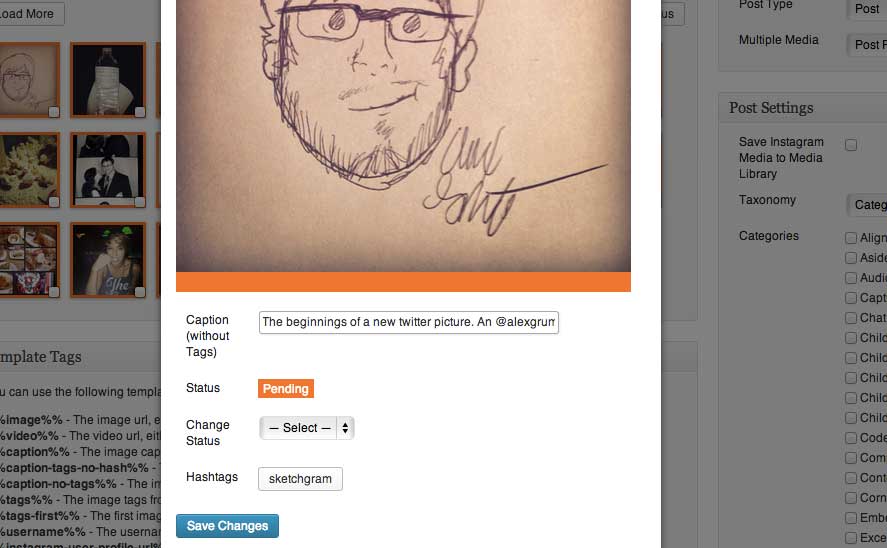
Clicking on any image will bring up metadata options
There are also options for customizing a map if you are using the Media Grouped option and the ability to add a featured image that is the same for all photos, but these are a bit beyond the scope of this walkthrough.
Once you are all finished, just click the “Publish” button and Instagrate will begin to post photos per the frequency you specified.
Just note that once a photo/post is published, it is on your site, mixed in with other published posts. That means you will have to go to your post listing dashboard and Trash it.
Costs, Caveats, Etc.
Instagrate is a premium plugin, with licenses for single, multi-site and unlimited sites. The developer is consistently adding new features, and support is included with the purchase of a license. If you are having some trouble getting started, you can visit the plugin’s documentation.